Preservation Self-Assessment Program
User Manual
- PSAP's History and Background
- PSAP's Technical Specifications
- Who Should Use PSAP?
- How Should PSAP Be Used?
- Preparation and Set-up: What You Need Before You Get Started
- PSAP Walkthroughs
- Cloning Existing Records
- Moving Existing Records
- Interpreting PSAP's Assessment Scores and Reports
- Importing and Exporting Data
- Why Descriptive Data is Important
- Using the Supplemental Guides and Other Helpful Resources
- Using Basic and Advanced Help
Supplemental Guides
Understanding Use of Certain Fields and Approaches in the PSAP
- Preservation Assessments and Surveys
- Assessing a Repository or Collection Using a Sample
- Understanding Significance
- Understanding Dates
Understanding Institutional Practices
- Preservation Planning
- Environmental Guidelines
- Use and Access
- Understanding Metadata
- Exhibition Guidelines
- Collection Development Policy
- Disaster Preparedness
Additional Information and Tools
- When to Bring in a Professional
- Disaster Resources and Recovery Vendors
- Grant Resources
- The Role of the Artifact in the Age of Digitization
- Mapping to Past Perfect
PSAP's History and Background
PSAP has been made possible with federal funding through an Institute of Museum and Library Services National Leadership grant, administered by the Preservation Program at the University of Illinois Libraries. The project’s scope was to further enhance and migrate a previously developed project (the Audiovisual Self-Assessment Program, AvSAP to create a web-based open source software application that led users through preservation assessment of audiovisual, photographic, paper, and bound materials commonly held in libraries, archives and museums. The project was funded for development from December 2012 – December 2015, with public release of the application in the late spring of 2015. As the result of a no-cost grant extension, in late 2016 the scope of the PSAP was expanded to include basic museum object materials made of stone, ceramics, glass, and metal.
If you need help cross-walking data from the AvSAP to PSAP, please contact Project Lead, Jennifer Hain Teper.
PSAP's Institutional Partners
- Chicago History Museum
- Heritage Preservation
- Illinois Heritage Association
- Illinois State Archaeological Survey
- Illinois State Library
- The Institute of Museum and Library Services
- The McLean County Museum of History
- The Spurlock Museum
- The University of Illinois Conservation and Preservation Unit
- Urbana Free Library and Champaign County Archives
PSAP's Technical Specifications
The web-based PSAP application is optimized for the recent versions of the following web browsers: Firefox, Safari, Chrome, Opera, and Internet Explorer. PSAP is platform-independent and is designed to run on the entire spectrum of internet-capable devices, from desktop and laptop computers to handheld and tablet devices.
The PSAP project has been developed using open source software and the code is available for those interested in hosting a local copy of the PSAP or modifying a local copy. All technical information is hosted on GitHub. The GitHub wiki also offers background and documentation on the development and functionality of the software. The University of Illinois is committed to providing free hosting and long-term storage (backed up nightly) and maintenance for the PSAP application as well as for all data entered into and generated by the program.
Who Should Use PSAP?
PSAP is intended as a tool to help individuals and the staff of smaller institutions assess collection materials. It is not intended to be a replacement for professional conservation/preservation consultants' assessment of individual items or collections, but can be used as a first step towards a more fulsome professional consultation, to define project scopes, or to justify funding for preservation efforts.
How Should PSAP Be Used?
The PSAP is first and foremost an assessment tool, but also contains significant educational components developed to assist non-specialists in better understanding preservation of the materials in their care. The program can be used on unprocessed collections as well as fully described materials. While the most meaningful results will be produced by using the PSAP to evaluate collection at an item-level, the PSAP can also be used to evaluate collections using sampling techniques (this approach is discussed in detail later in this user manual, see Assessing a Repository or Collection Using a Sample) so that only a portion of a larger collection need be inspected. The information generated from the PSAP, in the form of 1) individual preservation scores for items, 2) aggregate preservation overviews for collections, and 3) summary scores for institutional preservation practices and storage environments, will offer users quick, numeric and graphic representations of the highest preservation needs in their collections, which can lead to more detailed assessment or review, consultations with professional conservation or preservation professionals, rehousing projects, or other preservation projects to improve long-term accessibility of materials.
Materials and Formats Covered
The PSAP covers architectural, audiovisual, cartographic, paper-based, photographic, and photomechanical materials, as well as the following inorganic object materials: ceramic, glass, stone, and metal.
Audiovisual formats/materials include:
- Audiotapes: 1/4" Open Reel, 1/2" Open Reel, 1" Open Reel, 2" Open Reel, 8-Track, Compact Cassette, Continuous Loop Cartridge (Cart), Digital Audio Tape (DAT), Digital Compact Cassette (DCC), Microcassette
- Films: 8mm, 9.5mm, 16mm, 35mm, Super 8mm
- Grooved Cylinders: Plastic, Wax
- Optical Media: Compact Disc (CD), DVD, LaserDisc (LD), MiniDisc (MD)
- Phonograph Records: Aluminum, Lacquer, Shellac, Vinyl
- Videotapes: 1/2" Open Reel, 1" Open Reel, 2" Open Reel, Betacam/Betacam SP, Betacam SX, Betamax, D-1, D-2, D-3, Digital Betacam, DVCam, DVCPro, HDCam/HDCam SR, HDV, MiniDV, U-matic/U-matic SP, VHS, Video8/Hi8
- Wire Recordings: Wire Audio
Bound book formats/materials include:
- Binding Types: Accordion, Double Fan Adhesive (DFAB), Perfect, Punch-and-Bind, Spiral, Stab, Stapled, Through-the-Fold, Oversewn
- Board Types: Paper, Wood
- Coverings: Cloth, Leather, Paper, Parchment, Tawed
- Ink Types: Ball-Point Pen, Carbon Black, Colored Pencil, Copying Pencil, Dye-Based, Felt-Tip Pen/Marker, Graphite, Iron Gall, Pigment-Based, Typewriter Ribbon, Wax-Based Pencil/Crayon
- Paper Types: Acid-free, Coated, Newsprint, Rag Paper, Proprietary, Tracing/Transparent
Photographic and image formats/materials include:
- Cased/Direct Photographs: Ambrotype, Daguerreotype, Tintype
- Color Prints: Chromogenic Color, Color Carbro, Dye Transfer, Silver Dye-Bleach
- Digital Prints: Inkjet, Laser
- Instant Photos: Black-and-White, Color
- Microforms: Mixed Aperture Card, Paper Microcard, Paper Microprint, Plastic Microfiche, Plastic Microfilm
- Monochrome Prints: Albumun, Carbon, Cyanotype, Gelatin POP, Glossy Collodion, Matte Collodion, Platinum/Palladium, Salt, Silver Gelatin DOP
- Negatives: Albumen Glass, Chromogenic Color, Collodion Glass, Gelatin Glass, Silver Gelatin
- Photomechanical Prints: Collotype, Gravure, Letterpress Halftone, Offset Lithography, Woodburytype
- Slides/Transparencies: Glass Autochrome Slide, Glass Black-and-White Slide, Plastic Black-and-White Film, Plastic Color Film
Unbound paper formats/materials include:
- Architectural Drawings: Aniline, Blueprint, Diazo, Electrostatic, Ferro-Gallic, Gel-Lithograph, Hectograph, Photostat, Van Dyke, Wash-Off
- Office Prints: Carbon Copy, Carbonless Copy (NCR), Color Photocopy, Copybook/Roller Copy, Diazo Print, Diffusion Transfer, Dual Spectrum, Electrofax, Electrostatic Copy (Xerox), Impact Print, Inkjet Print, Laser Print, Lithograph/Office Litho, Photostat, Spirit Duplicate, Stencil Copy, Thermal Print (Thermofax), Typography
Object materials include:
- Archaeological materials: previously buried (ground or water) whole and fragmented glass, stone, metal, and ceramic
- Non-archaeological materials: glass, stone, metal, and ceramic items that have never been buried
Materials and Formats Not Covered
The PSAP does not address the conservation or preservation needs of audiovisual formats originating outside of the United States.
It is not intended to be used for the assessment of materials other than physical audiovisual recording media, books, papers and image materials, and inorganic museum objects made solely of ceramic, glass, stone, or metal. The PSAP should not be used to assess agricultural tools, architectural materials, artistic installations, artwork, botanical materials, clocks, non-metallic monetary units, commercial/home electronics, computer hardware and software, digital preservation strategies, engravings and etchings, equestrian and livery equipment, firearms, funereal objects, furniture, household objects, human and/or other animal remains, industrial and other non-commercial equipment, maritime collections, military paraphernalia, organic materials, paintings, plaster casts or reproductions, raw and processed datasets, scrapbooks, outdoor sculptures, stamps and seals, and textiles. Of the above objects, only non-composite objects of ceramic, glass, stone, or metal are included in the PSAP.
Still, there are areas of overlap between format and material types that enable the PSAP to be of some limited use for certain resources. For example, while the PSAP does not explicitly address the preservation of scrapbooks, one certainly could use advice given in the PSAP's supplemental guides as a resource for the preservation of common scrapbook components like paper media, inks, and photographs. Similarly, composite objects are not directly addressed by the PSAP as preservation assessment and needs become complicated when multiple materials exist on one object. For example, a glass-and-metal object cannot be treated as though it were solely glass or solely metal, as the two materials can react differently in different environments-- creating additional concerns for care, handling, and storage that will not be addressed by PSAP.
Preparation and Set-up: What You Need Before You Get Started
In order to get started with PSAP, it is necessary to register either yourself or your institution. Multiple users can register to be affiliated with the same institution, however being linked to an institution requires authorization by PSAP administrators. Authorization is intended solely to prevent malicious access to institutions' and individuals' private information. Registration is available off the main project website: . To view the PSAP application without registering, you may enter the application using the logon ID: Testuser, and the password: “Rjc9n!”.
Planning for Your Time on the PSAP
Expect that your first time into the PSAP will go a bit slow. As a first time user, you will be asked to enter information about your institution and storage/exhibit locations that you will only need to enter once. Additionally, if you are not familiar with the types of materials you are assessing, you will be asked to identify formats of the items in your collection. The PSAP is designed to give you as much in-depth help as you need to lead you accurately responding to our questions, however, once you get more familiar with the format types in your collection (i.e. you know what a silver gelatin developing out photographic print looks like) your Collections ID skills will improve. While we cannot estimate how much time each evaluation could take a user, we have made every effort to minimize our questions to the very most critical in order to evaluate preservation effectively. Our goal has been that each item takes only a few minutes from start to finish once you are comfortable with the interface and your most common formats.
For further information on assessment preparations, see the supplemental guides on Material Inspection and Cleaning, Playback, Record Protection Mechanisms, and Use and Access.
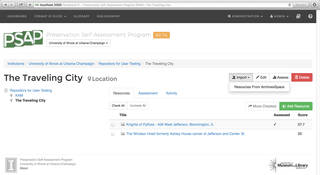
PSAP Walkthroughs
General Lay-Out
PSAP allows interactions with assessment reports and scores through either an administrative or staff user dashboard. Dashboard options are designed differently in order to better meet the needs and purposes of staff versus those of administrators.
The website is organized with some sense of hierarchy between four views of--and levels of access to--assessment details. The Institution view is at the top level, followed by Repository, Location, and Resource. This hierarchy displays on the left side of the application at all times to aid with navigation throughout the assessment process.

Getting Started
PSAP provides a separate document, called Getting Started as a quick start reference for users. This document offers a simple, graphic inteface and short video clips that illustrate the basic navigation through the PSAP.
Registering an Institution
The first step towards using PSAP is to register yourself as either an independent user or as part of an institution. To begin registration, you must first sign up for an account. Click on the blue 'Sign up now' script in order to be sent to the registration form. Once on the sign up form, you should provide your name and email address. You will also have the ability to request a specific username.After you have completed the web form, a password will be emailed to you (logon requests are vetted by a real human, so this request process may take up to 24 hours). Once you have received your logon, direct your browser to / and enter your assigned user name and password. Then, click the blue "Sign in" button.
As a first time user, you will view a welcome panel upon your first logon which will give you some pointers for your first use of the PSAP, as well as ask you to participate in a survey that will collect a small amount of information about your knowledge of preservation practices and your institution (if you have one). This survey information is valuable to us in assessing the success of the grant project and could help us in future iteration of the PSAP, we encourage you to take the five minutes to fill out the survey.
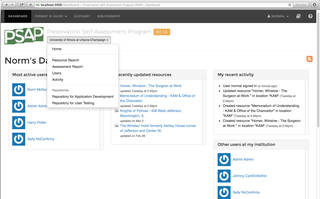
Your Dashboard
Once you have logged on, you will be directed to your dashboard. Depending on the type of user you are your dashboard may appear differently. A very small number of users who are coded as "administrators" will have a different format dashboard with access to other users accounts who they manage, however, the vast majority of users will have a "normal user" dashboard. In general, however, any dashboard will have several key components:
- You will have a collapsible resource tree on your left showing institution, repositories, locations, and resources that have been entered into the PSAP for quick navigation;
- You will have a quick link to the last resource added to the PSAP.
Click here to view an overview of the PSAP including navigating your dashboard
Introduction to the Institution Screen
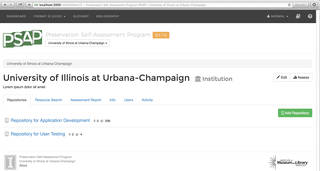
Once your account has been set up, there are several different functions and views that you can access through the Institution screen, including viewing the differenent repositories affiliated with an institution, searching all resources within an institution, viewing assessment reports, and main contact information for an institution. Some of this information may only be utilized once assessments of individual resources has been performed.
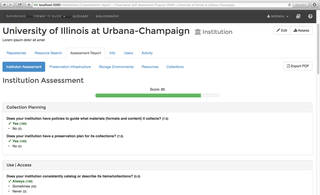

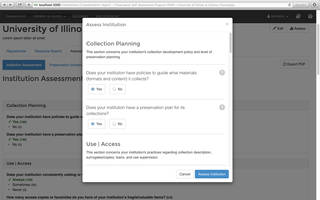
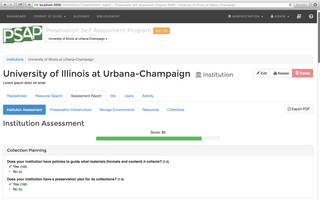
Assessing an Institution
Once you have registered an institution and feel comfortable navigating your dashboard, it's time to start the process of assessing your institution, locations, and resources. As the first step towards assessing your collection, PSAP will ask you to first assess your institution and then to assess your location and the resource itself. Although your responses to the institutional questions are important, and will be scored, they will not affect your final resource scores. You will only be asked to assess your institutional preservation practices once, and will not need to repeat this step once it's completed. Your resulting score can be used to evaluate the "preservation savviness" or existing preservation infrastructure of your institution.
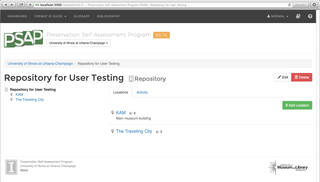
Adding a Repository
Once the institution has been registered and assessed, you will need to add information about the repository storing your resources. One institution, such as the University of Illinois may have many repositories, such as the "University Library", "University Archives", or "Spurlock Museum", for example. Most users will work in only one repository and in smaller organizations, the institution and repository may be the same.
Adding and Assessing a Location
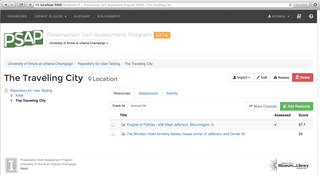
Now that you have added and assessed the institution and added the repository, you will need to enter information about the location of your resources within its repository. In order to do this, you will need to first add the location and then to assess it, by clicking on the "add location" button in the top right of the screen.
Information on your locations (and the scores generated from their assessments) is saved and each can be selected as a saved location as you add resources to the PSAP.
Adding and Assessing a Resource
Now that you are done entering information about your institution and your resource's repository and location, you can finally begin the process of assessing your resource. Similar to how you added your institution and location before assessing them, you must first add a resource before assessing it.
To create a resource, click "add resource to assess", give the resource a name (this can be based on unique identifiers already in place in your collection) and select whether your resource is a collection with items within it which you want to be able to assess as a collection, or whether it is an item unrelated to a collection. You will will also be asked to identify the format of the resource, if at an item level (see the Collection ID Guide for assistance with format identification) and will be given the option to provide descriptive information about the collection/item. This descriptive information is optional. See Why Descriptive Data is Important for more detail on the value of these questions.
Click here to view a short video on creating collections.
Once you have created a resource, select the resource and click on the "assess" button. Then, in the pop-up window, you will answer guided questions about:
- Storage containers and orientation
- Storage environments in which the item resides
- Physical condition and defects like inherent vices, mold exposure, and structural problems (e.g. the amount of scratches and dust on a grooved audio record)
For each question, you simply choose the answer that best describes the storage or physical condition of the item. Although "Unsure" is an option in many cases, the assessment becomes more diagnostic and useful the more completely you answer each question.
In most areas, the terms used do not require foreknowledge of cataloguing or metadata practices, although the information provided will be more accurate with such training. Since PSAP is designed to aid users with any level of experience, basic help windows are built into each question, so you can always look up unfamiliar terms. There is also a more detailed advanced help guide, glossary, format identification guide, and a number of supplemental guides to provide you with further guidance.

Cloning Existing Records
To help speed along the assessment process, the PSAP is equipped with a cloning functionality. This tool is most helpful when you are assessing a run of individual materials that share most or all of their descriptive information. For instance, a collection of 25 8x10 black and white photographs of the same subject will share many data points. The clone function will allow you to create a new record that exactly copies the information from an existing resource record, reducing the need to re-enter that information manually. When you select to clone a resource (by clicking on the “Clone” button on the upper right of the resource page), you will be prompted to clone the record either “including the assessment”, or “without the assessment”. If the condition or storage of the object is in any way different than the previous resource, you should choose to clone without the assessment. However, if all the materials are stored together and in the same condition, you may also choose to clone the assessment along with the resource information. In either case, be sure to change the name for the resource so that each item is differentiated.
Moving Existing Records
Another handy tool offered by the PSAP is the “Move” function. This function can be used to update records if an item or collection is shifted from one location to the next. Resources can be shifted individually from the resource page by clicking on the “move” button, but can also be shifted in batches from the location screen by selecting resources found listed under any one location (items are selected by clicking on the checkbox to the left of the resource) and then clicking on the “move checked items” button at the top right. In either case, you will be asked to select a new location for the selected resources and the PSAP will change their location and scores to reflect this modification. This functionality can be particularly useful if you are considering the best long-term storage for an object or collection of objects. Once the descriptive, format, and condition information are entered, materials can be “moved” to different locations and scores can be compared to find the best location for long-term preservation.
Deleting Records
While the University of Illinois is committed to providing free long-term storage (backed up nightly) and maintenance for the PSAP application in order to protect against any data-loss caused by system failure, PSAP data that is deleted by a user is not recoverable. If a user chooses to delete a resource, location, repository, or institution, then all information associated with those entities will be permanently deleted. This means that if a user deletes a location, then any objects associated or “housed within” that location are also deleted. Similarly, if a user deletes a repository or institution, any locations and resources within the repository or institution will also be deleted. PSAP administrators are unable to recover any PSAP data that are purposefully deleted by a user, so please be thoughtful when deleting data in the PSAP.

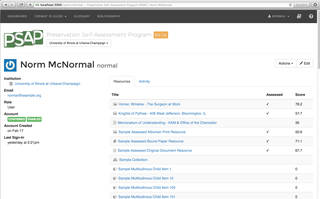
Interpreting PSAP's Assessment Scores and Reports
Once you have completed entering in assessments for your institution, locations, and at least one resource, you will have a complete PSAP score for that resource. Scores can be viewed individually by clicking on the “Score Summary” tab on the Assessment Report screen. You can also click on "Assessment Report," under the "Dashboard" on the left side of the screen or on the "My Dashboard" page to view aggregate scores for all the information you have entered for your institution. Many factors go into generating an item's ranking: the physical condition of the item, the format of the item, the conditions of the environment in which the item has been stored, and the container (or lack thereof) of the item. Many questions in the storage environment and item-level assessment sections have weights that affect the final score (and thus the ranking) of an item. The more questions you answer about an item, the more diagnostic the item's score will be. With more diagnostic information about each item, your assessment report will be more accurate and complete at the end of the assessment. You can use this list to plan your preservation efforts and make more targeted budgetary choices. The PSAP assessment report can also be used to document your specific needs to granting agencies and your organization's budget managers.
For more information about interpreting data from assessments, see Preservation Assessments and Surveys.
How Should I Interpret Assessment Scores?
Scores are generated by pulling information from values entered for the location, format, and condition of a given resource and combining them to give a final value between 0 and 100, where 0 is the lowest possible score and 100 is the highest possible score. Note that scores of 0 and 100 are both nearly impossible actually attain for your final score (though possible in sections such as Location), and most final scores actually lie between 50 and 90. The final resource score is weighed such that the condition of an item is weighted as half (50%) of the score, the format of the resource is 40%, the location of the resource is 5%, and the temperature and relative humidity of the location are each 2.5% for a total of 100% of the total score. This weighting of scores was developed by the project team to represent the understood balance of the current condition of the object with the inherent vice of an individual artifact (format) and the effects of the environment on that particular format (Location, Temperature and RH).
Click here to view a short video on interpreting your PSAP scores.
A summary judgement of the preservation/conservation needs of an item or collection depends on the value of the final assessment score. Broadly speaking, a score can be understood as: low = below 60, moderate = 60-80, and high = 80-100.
How Should I Interpret Assessment Reports?
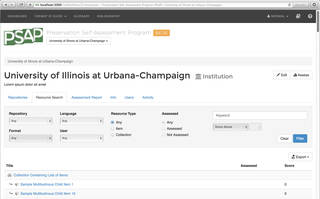
PSAP's assessment reports display several fields: collection name, item name, location (i.e. the storage environments you have assessed), the total assessment score, item format, item significance, and the notes field for each item. The list can be sorted by each of these fields. Although the PSAP score is out of 100, the obsolescence of the various media types and their inherent instability makes it very difficult to get a score near 100. It is very likely that your highest scores will be far lower than 100. Don't fear! Many materials are, generally speaking, not built to last. It's very common for PSAP assessments to have few items that score higher than 80.
Click here to view a short video on understanding PSAP reports.
Importing and Exporting Data
PSAP data is designed to be exportable as spreadsheets in common formats that can be easily integrated and manipulated with an institution's data management services. The data can be exported both as a PDF and a CSV or JSON file.
In order to export a pdf, you must be at the institutional level. Once you select Assessment Report, the export option will appear on the right.
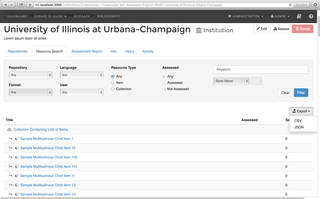
In order to export a CSV/JSON files, you must be at the institutional level. Once you select Resource Search, the export option will appear on the right. Click on it to select the format that you prefer.
Exporting Metadata
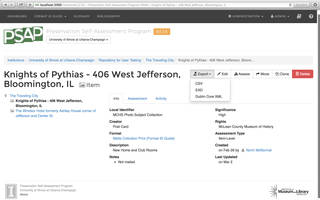
In order to export metadata, you must be at the item level of an assessed resource. You will be provided with the option of exporting metadata as CSV, DC, and EAD files. Dublin Core (DC) metadata is exported as DC-XML code and is only available at the item-assessment level. Encoded Archival Description (EAD) metadata is exported as EAD-XML code and is only available when one is assessing at the collection-sample level.
Importing Data Files
As an added feature, we have designed the PSAP to import EADXML data from the ArchivesSpace. software. To export existing records from ArchivesSpace, see http://www.archivesspace.org/importexport.
In order to import a file, you must be at the location level. You will see the option to import data through a white dropdown box. Click on that and select 'Resources from ArchivesSpace.' Then, choose which files you'd like to upload from your downloaded and saved data.
Why Descriptive Data is Important
We purposefully require minimal descriptive information about the materials to be assessed both to streamline data entry, but also because that information may not be available for all materials, however, that should not downplay its importance.
If your institution already has a catalog or inventory of your collections with information about the materials held within them, you may choose not to record descriptive information in the PSAP, but instead note a barcode, call number, accession number, or other unique identifier in the PSAP that will help users link between the preservation assessment in the PSAP and the descriptive information about the object. This will help better prioritize materials for preservation later, when the value of materials to the collection is necessary to create priorities.
If your institution does NOT have a catalog or inventory of the collections you wish to assess, entering descriptive information will be helpful for several reasons.
- It will help you describe your collections to others
- It can be used to create inventories or finding aids to help users and staff
- It can be exported into Past Perfect software. See Mapping to Past Perfect for more information on moving data from PSAP to Past Perfect
- It results in better intellectual control over your collections allows you to better assess priorities for preservation, or other actions
While PSAP focuses mainly on the physical condition of the items being assessed, no assessment can be complete without acknowledging the significance of an item to the repository. Significance refers to the intellectual content of the item and its value to your collection. During the item-level assessment, PSAP asks you to rate the significance of each item. This rating does not affect the final assessment score but serves to "flag" items that have high significance. The collections manager can then consider the significance of items when using the PSAP preservation assessment report. For example, a collections manager may decide to focus preservation efforts on an item high in significance even though it scores low on the PSAP assessment report. The help window for this question provides several methods of assessing significance to help you generate a useful answer. See Understanding Significance for more information.
Using the Supplemental Guides and Other Resources
IN addition to this User Manual, there are many resources that may be useful to PSAP users. There is a Glossary of Terms to help those new to preservation better understand the terminology, as well as a Selected Bibiography of resources used to develop that PSAP that may be used by those seeking more information on specific topics. The User Manual and the Collection ID Guide (CIDG) also offer supplemental guides that speak to different aspects of conservation and preservation needs, as well as quick reference "cheat sheets". These guides provide additional information geared towards helping users either use the PSAP more effectively, or better understand the preservation needs of their collections in a broader scale. The Supplemental guides are broken into four areas of focus:
- Audiovisual-Specific Additional Information (in the CIDG)
- Identification Cheat Sheets (in the CIDG)
- Material/Format Additional Information (in the CIDG)
- Policy/Procedure Information (later in this User Manual)
Using Basic and Advanced Help
PSAP is designed to be both an assessment tool and an educational tool. So, for example, the illustrations and descriptions in the Audiovisual Media section of the Collection ID Guide provide guidance on identifying audiovisual formats. If you aren't clear what the question is asking, you can click on the question's "help" icon located next to the symbol. This will open a window to the right of the question that contains information explaining what kind of information the question is trying to obtain. Alternatively, this basic help text can be turned on simply by clicking on the arrow next to the icon at the top right of the screen–this will activate the help text for whatever question you are currently typing in. To close this help screen, simply click on the arrow.
The PSAP also provides pop-up windows that lead to advanced help options throughout the assessment program. The Advanced Help guide can be accessed by clicking on the symbol next to each assessment question or by clicking on the hyperlinks for more information located in the basic help text. These boxes give users help in answering the content of the question. For example, if a user wanted to answer a question about the level of "vinegar syndrome" that a 16mm film was suffering from but did not know what vinegar syndrome was or how to assess it, he/she would click on the symbol next to the question for a popup that would explain what vinegar syndrome is, what causes it, and how to assess its level in a motion picture film. Many boxes also provide pictures to further help the user understand the concepts underpinning the question.

In summary, PSAP provides help by:
- explaining the assessment questions;
- explaining the concepts behind the questions;
- explaining how best to interpret your answer choices;
- providing images (where possible) to illustrate the concepts;
- minimizing subjectivity in the questions by giving you a practical sense of what the questions are looking for;
- providing educational resources to help understand the concepts and methods associated with item and collection preservation;
- providing recommendations, tips, and best practices so that you can improve the preservation practices in your own institution.
Supplemental Guides
Understanding Use of Certain Fields and Approaches in the PSAP
Preservation Assessments and Surveys
What are preservation assessments and surveys? Why do they matter?
Preservation assessments and surveys are a key element of good collection stewardship as they allow collection managers and curators to become more familiar with the condition of their collections and derive useful and accurate data about collections. This data helps managers to then establish and articulate preservation needs. In general, a preservation assessment considers many different facets of preservation need, ranging from the condition of specific materials to understanding how the building, environment, policies, and use all affect the health of the materials overall.
What’s the difference between the two?
Preservation Assessments: Most often, a preservation assessment evaluates the policies, practices, and conditions in an institution that affect the preservation of all or specific collections and considers the general state of the collections being evaluated, what is needed to improve that state, and how to preserve the collections long-term. It must identify specific preservation needs, recommend actions to meet those needs, and prioritize the recommended actions.
Typical components of a preservation assessment may include all or some of the following:
- Building/facility characteristics, including structure and maintenance;
- Environment of the building, including climate control, lighting, pests, housekeeping, fire protection, and security;
- Policies that affect preservation of collections, including emergency preparedness, disaster response, security, exhibit, circulation, and loan;
- Storage and exhibit areas, including shelving/case types and their condition as well as shelving and exhibit practices;
- Condition of the collection, either through a sample or item-level survey;
- Storage and handling practices, including use of protective enclosures, shelving practices, and staff handling;
- Reformatting and repair options available.
Preservation Surveys: By comparison, a preservation survey collects data on individual items to generate a broader understanding of the condition of materials. Therefore, preservation surveys are often incorporated into larger preservation assessments or provide information that can develop short or long-term preservation plans for collections or entire institutions.
Surveys may be one of two types:
- Condition surveys, which are designed to identify the physical condition of the collection in a specific manner, often combining observations on damage and deterioration with known use;
- Action surveys, which express the preservation needs of the collection in terms of actions that will secure, replace, protect, or treat the items examined.
Surveys can look at every item in a given collection, or at a sample of a larger collection. The PSAP (and AvSAP) can be utilized for both item-level and sample surveys (See sample versus item level assessment document for specifics on these two approaches and the benefits and drawbacks of each). From the information collected, survey data can be used to generate preservation priorities, which can be combined with collection/curatorial priorities as shown below to arrive at a prioritized approach to preservation action.
Preservation and Curatorial Priorities: An Example of Prioritization Outcomes
| High Use/Value | Moderate Use/Value | Low Use/Value | |
|---|---|---|---|
| Poor Condition | VERY HIGH | HIGH | MEDIUM |
| Fair Condition | HIGH | MEDIUM | LOW |
| Good Condition | MEDIUM | LOW | VERY LOW |
Resources
- Brown, K. (2005). Use of General Preservation Assessments Process. Library Resources and Technical Services (LRTS), 49(2) April 2005: 90-106.
- Brown, K.E.K. (2006). Use of General Preservation Assessment Outputs. Library Resources and Technical Services (LRTS), 50(1), Jan 2006: 58-72.
- Buchanan, S., & Coleman, S. (1987). Deterioration Survey of the Stanford University Libraries Green Library Stack Collection. In P. Darling (Comp.) & Wesley Boomgaarden (Rev. Ed.), Preservation Planning Program Resource Notebook. Washington, DC: Assn. of Research Libraries, Office of Management Studies.
- Child, M. (1994). Preservation assessment and planning. In Preservation of Library and Archival Materials: A manual. Andover, MA: Northeast Document Conservation Center, 1994. Retrieved July 30, 2014 from: http://www.nedcc.org/free-resources/preservation-leaflets/1.-planning-and-prioritizing/1.2-preservation-assessment-and-planning
- Ogden, S. (1994). The Needs Assessment Survey. In Preservation of Library and Archival Materials: A manual. Andover, MA: Northeast Document Conservation Center. Retrieved July 30, 2014 from: http://www.nedcc.org/free-resources/preservation-leaflets/1.-planning-and-prioritizing/1.3-the-needs-assessment-survey
- Walker, G. (1985). The Yale Survey: A large-scale study of book deterioration in the Yale University Library. College and Research Libraries, 46 (March 1985): 111-132.
Assessing a Repository or Collection Using a Sample
The most diagnostic assessment option is an item-level assessment, in which each resource is individually assessed. Item-level assessment is recommended for either individuals or institutions with a small number of items or for institutions with enough staff and time for this type of thorough assessment.
An alternative approach to assessment is based on sampling. This is most useful for larger collections where item-level assessment would be too time-intensive. This method can be useful to help establish preservation priorities in a large collection, allowing you to strategically focus item-level assessments on the materials with the greatest need. A random sample assessment may also be useful to identify preservation needs for grant applications and other fund-raising efforts.
Item-level and collection-level assessments will produce different final products, though the reports will look similar in format. Although a random sample assessment will generate a final assessment report, it represents only a "snapshot" of preservation needs and priorities based on format and storage conditions. PSAP sample assessments can be done by one of two methods: a set percentage sample or a statistically valid random sample.
If your collection is large, you may consider doing a sample assessment, which can bbe approached in one of two ways:
- A Set Percentage by Collection
- A Statistically Valid Random Sample
A Set Percentage by Collection: To gather a very basic view of your materials, you can sample an identified percentage of the entire collection. We recommend a minimum of 10% of the total population of materials, or every tenth item. This method is particularly helpful if you don't know how many items you have. A set percentage sample will not provide detailed guidance on how many or which items need attention, but it will help prioritize preservation needs for the entire collection. You can then return to an item-level assessment for more detail or leverage your collection-level results to argue for preservation funding.
Creating a set percentage sample is relatively easy. If you want to end up with a 10% sample, you will assess every tenth item. If you want to end up with a 20% sample (which will be approximately twice as accurate as a 10% sample), you will sample every 5th item. The higher the percentage of your sample, the more accurate your results will be. Samples of less than 10% may give you a general idea of what your preservation needs are, but accuracy will be low and results should not be used for estimating specific project times or budgets.
A Statistically Valid Random Sample: A statistically valid random sample will give you estimated numbers of particular formats in your collections, their locations, and their prioritized preservation needs. This method requires that you know your total number of items to create a representative sample. You use either MS Excel or random number tables to select the sample. This provides more useful results because it commonly uses a larger sample than a set percentage sample. It requires more work to set up than a set assessment sample, but it is far less time consuming than a full item-level assessment.
Creating a random sample is slightly more complicated. First, you establish the total number of items in your collection (or the portion of your collections that you wish to survey). This is called your "population." You then choose what level of accuracy you want from your results. Accuracy is measured in two ways: "confidence" and "tolerance/margin of error." Confidence is a measurement of accuracy based on the repeatability of the sample. If you choose a confidence of 90% and you repeat the sample 100 times using a different randomly selected sample, your results would be the same 90 of those 100 times. Recommended confidence levels for sampling a collection are 90, 95, and 99 percent. Ninety-five percent is usually the optimum confidence level for accuracy of results and manageability of sample size. Tolerance or margin of error is the threshold of error that you allow for your results. For example, if your sample tells you that 80% of your collection consists of VHS tapes and you have set your margin of error to plus or minus 5 percent (±5%), then your collection might have between 75-85% VHS tapes. Common tolerance thresholds are ±2 or ±5 percent.
When you combine confidence and tolerance, you get the overall accuracy of your sampling results. For a sample that results in 95% confidence with a tolerance of ±2%, you would know that in 95% of the times you repeated the survey, the number of occurrences (of any one format or identified level of deterioration, etc.) would be accurate 95 out of 100 times within a range of ±2 percent. Once you have selected your desired confidence and tolerance, you use these values to determine the sample size of your overall population. Many web applications can do this for you, and a simple search for "sample size calculator" will likely yield several. One of our current favorites is the Raosoft Sample Size Calculator available at http://www.raosoft.com/samplesize.html. Simply enter values for margin of error, confidence level, and collection size, and the calculator will calculate how many items you need to sample. In a collection of 5,000 items with confidence set at 95% and tolerance set at ±2%, your sample size would be 1,623 items. For a confidence and tolerance of 90% and ±5% (much less accurate but still valid for many purposes), your sample size need only be 257 items. Finally, you must determine which items of your collection you are going to sample. To make a sample statistically valid, items must be drawn from your collection RANDOMLY. Random numbers can be generated through Microsoft Excel, a web-based random number generator, or a published book of random number tables. [Note: numbers generated through Excel or a web based number generator use a complex mathematical algorithm, which to a statistician is not truly random. However, they are considered 'nearly random,' which works just fine for our purposes.]
If all of your materials are combined in one area and can be assessed linearly, selecting a random sample is straightforward. A list of random numbers between one and the total size of your collection can be generated, and items matching the random numbers are pulled for the sample. However, this method is less straightforward for multiple archival collections spread among different locations. If this is your situation, you can randomly select both a collection number and an item number or even randomly select collection, box, and item number. For example: if you have 50 collections that have materials to be assessed, each collection has a maximum of 200 boxes, and each box contains a maximum of 100 items, you can generate three random number lists and work down all three lists in tandem. To generate your random numbers, you would require three lists of random numbers: one of numbers 1-50 for the collections, one of numbers 1-200 for the boxes, and one of numbers 1-100 for the items. It is recommended that you have at least double the number of random numbers in each list as the size of your sample. So, if your sample size was 257 items, each list should have about 500 random numbers between the defined range.
Understanding Significance
The PSAP recognizes that an item or collection's informational content can--and sometimes should--be taken into account when generating a prioritized preservation plan. In the PSAP application, significance is either selected or it is not, there is no scale of significance or option for indicating what type of significance is associated with a resource. Choosing a level of significance in this question will not affect the overall score of the resource. It can, however, allow you to rank your decision list by significance should you choose to. Consider this question as a way to flag significant materials in your decision list. If you have a resource item or collection that is in poor physical condition but has little significance to your institution, you may choose to put it lower on your prioritized list than a resource in better physical condition that has greater significance to your institution. For this reason, PSAP can factor this added nuance into its results through an evaluation of a resource's 'significance'.
While this field is optional, we recommend you consider the significance of the item as it will affect your preservation decisions, particularly when you have a limited amount of funds and a great deal of materials to treat. Of course, you may also exclude this consideration if you wish. This is the best choice for users that only have interest in the physical condition of the items you are assessing, without respect to the informational content of the materials.
For our purposes, we break down the concept of "significance" according to traditional archival theory:
- Significance of the item/collection to your institution and its mission
- Significance of the item/collection to your users
- Contribution of the item to scholarship
- Uniqueness of the item/collection. (Uniqueness in this context refers to how many copies exist. Commercially produced materials are not usually considered unique. An example of an unique item would be a handwritten document, since it is unlikely that there are many copies of this item.)
- Costs of retention, or how much it would cost you (in terms of space, funds, and time) to maintain, store, and provide access to the item
- Importance of the events, people, or subjects related to the item/collection
- Political considerations involved in retaining the resource, such as the importance to your community, a donor, or the creator of the item/collection
These are just some of the factors you can consider when making decisions about the significance of an item or collection. Some institutions may consider the fiscal value of a resource as well, which is usually determined by an outside (third party) appraiser. Assigning a high level of significance to most or all of your materials will render this field worthless in your final decision list. For this reason, we strongly recommend for you to be as discerning as possible when assigning a level of significance to your materials.
Understanding Dates
Assigning dates to resources can be a tricky process, because it is often difficult to determine whether the date value should be the date the resource was created, the creation date of the items the resource contains (if it is a collection of items), the date of the original resource (if it is a digital version or facsimile), or the copyright date (usually in the case of a book). For the purposes of the PSAP, date values should represent the creation of the physical resources. This is important in determining the preservation risks to the physical material.
If you are interested in finding out more about describing archives resources, see the Society of American Archivists' Describing Archives: A Content Standard (DACS).
Entering Dates
The date value follows the YYYY-MM-DD syntax, and comes in three different forms (types):
Single date: Resource falls within a single year or has an exact date (e.g. "1987" or "1987-02-27")
Span/Inclusive range: Resource spans across a range of dates: the earliest and latest dates (e.g. Begin: "1987"; End: "2014")
Bulk range: Resource has a predominant focus in this date range; must be used to complement a span/inclusive date range (e.g. Begin: "1987"; End: "2014")
If the full date is unknown, month and year (YYYY-MM) or just year (YYYY) may be used.
Use Cases
- My resource is a single, hand-colored, silver gelatin print. This is one of several prints produced from a negative. The polyester negative was produced in 1957, but the print being assessed was produced in 1981.
- During assessment, the date assigned to this resource should be a single date of 1981, because that is the date that represents the material components of the print.
- My resource is a compact disc created in 2010 containing files originally created in 1985.
- For the purposes of the PSAP assessment, the date assigned to this resource should be a single date of 2010 because that is the creation date of the physical item. The PSAP is not designed to comprehensively address digital content; and while issues like file format obsolescence may affect the resource, that is outside the scope of the PSAP assessment.
- My resource is a collection of documents accessioned after the retirement of a faculty member, which were created throughout her many years at my institution from 1975-2005. However, the vast majority of the documents were created between 1999 and 2001.
- In this instance, the resource should be assigned a span/inclusive range of Begin: "1975"; End: "2005". Additionally, it could be assigned a bulk range of Begin: "1999"; End: "2001".
- My resource is printed ephemera, and I have no idea what the date of creation is.
- In this case, try using the Collection ID Guide to determine the general time frame that the resource could have been produced. If no date can be determined, you may leave the date field blank and continue to assess the resource without it.
Understanding Institutional Practices
Preservation Planning
A preservation plan is a document that addresses the overarching preservation needs and approaches for the collection(s) in your care and considers what steps the institution must take to address these needs with the resources it has available or means to acquire. A plan should not only address the value of materials—where value may be monetary, curatorial, rarity, etcetera, or any combination of these—but should also encompass all of the institution's collections to some extent, while prioritizing based on preservation need and value to the institution/collection. Preservation plans should be living documents, which grow and adapt over time as collections are added to the institution and institutional priorities change. Revision should occur every few years to accommodate accomplished goals and changing priorities and opportunities.
The PSAP can help with the formation of a preservation plan by giving you a deeper understanding of what collection materials are most at risk and, therefore, which collections require the most pressing preservation attention.
A preservation plan should describe the current state of a preservation program/initiative or the lack thereof. It should acknowledge support and interest in furthering preservation efforts, and it should clearly outline prioritized preservation needs and available resources, policies, and operations that support those needs. Specifically, a primary purpose of the preservation plan is to establish both short and long-term goals for the development of a preservation program/initiative. These goals should be prioritized for implementation in some manner, often by those obtainable with current staff and funding followed by those only obtainable with additional support—either through reallocated internal resources or external sources, such as grant funding.
Format-specific Preservation Plans
It may be useful to consider tailoring preservation plans or portions of a larger preservation plan towards certain formats in a collection(s) to develop preservation progress in a certain area. Audiovisual materials especially may benefit by this approach because of their unique fragility and susceptibility to obsolescence. The PSAP can help you assess the AV materials in your collections so that you can make informed and targeted decisions in terms of what to conserve and reformat, and when. Similarly, early photographic materials or fragile reprographic processes may be evaluated using the PSAP to guide collection managers in setting meaningful goals for the preservation of these often unique or near unique collection materials.
Resources
- Dean, J.F. (1995). Managing collection information for preservation planning. In Advances in Preservation and Access, Volume 2. Bedford, NJ: Learned Information, Inc.
- Ogden, S. (1994). What is preservation planning?. In Preservation of Library and Archival Materials: A manual. Andover, MA: Northeast Document Conservation Center. Retrieved July 30, 2014 from: http://www.nedcc.org/free-resources/preservation-leaflets/1.-planning-and-prioritizing/1.1-what-is-preservation-planning
Environmental Guidelines
Climate Control
The physical environment—and the ability to control it—should be the highest priority of any collecting organization. This encompasses balanced temperature and humidity, regulated light sources, clean and well-circulated air, and preventive measures against pest infestation and water exposure. An HVAC (heating, ventilating, and air conditioning) system the ideal mechanism for much of this, and is most cost-effective with regard to long-term preservation. But HVAC installation and repairs can be very expensive—perhaps too much for some organizations. See Control Mechanisms below for more.
Regardless of an organization’s financial resources, one can easily monitor and even manage environmental conditions with even a the most modest budget. The work that you put into your building’s envelope and climate control mechanisms has a direct and significant impact on the life-long health of your collection materials. With this in mind, always strive to maintain communicative relationships with your facilities and maintenance staff. Convert them to the preservation way of thinking whenever possible.
See the sections below and Exhibition Guidelines for practical steps to improve both macro- and micro-environments. If nothing else, try to keep most collection materials in an environment that most people would be comfortable in (65–68°F). But, of course, a colder and drier climate is almost always an improvement, so this means moving your materials out of the hot attic and the damp basement, if possible.
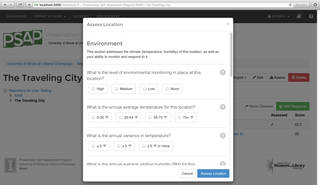
Environmental Monitoring
A monitoring program will allow you to establish a baseline for your environment and its typical conditions. From this data you can infer deterioration rates of your collection materials, the risk of mold outbreak, and likelihood of pest infestations. As a result, your organization will benefit from having hard data to improve policy and environment control measures. Environmental monitoring is the single most important thing you can do to sustain the life of your collections.
A full-scale environmental monitoring program should be comprehensive, including:
- Temperature: Establish an average temperature and the allowable annual variance.
- Relative Humidity (RH): Establish an average relative humidity and the allowable annual variance (RH is the amount of moisture [water vapor] held in the air, expressed as a percentage of the maximum amount that the air could hold at the given temperature).
- Pest Populations: The goal is not to eradicate all pests. Instead, integrated pest management (IPM) can be your first line of defense (see Mold/Pests below). Establish a normal, healthy range for your facilities throughout the calendar year and then continue to monitor fluctuations to make targeted adjustments.
Other environmental considerations include:
- Light Levels (visible light and UV light): Monitoring light levels (daylight and artificial lighting) will not necessarily be a sustained action (unlike temp., RH, pests), but results should be considered each time collections are shifted to a new environment (e.g. exhibitions).
- Pollution Levels: Monitoring contaminants is a relative rarity; valid pollutant monitoring requires gas analyzers and other expensive gear. Instead one can make sure that HVAC system’s filters are changed often to mitigate the effects of airborne pollutants.
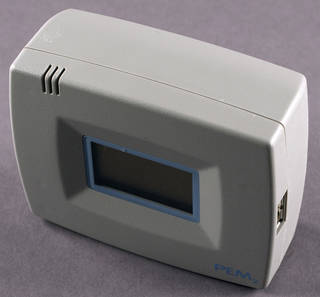
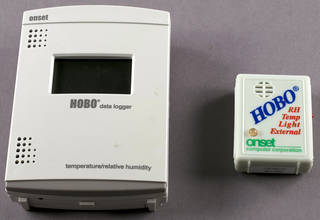
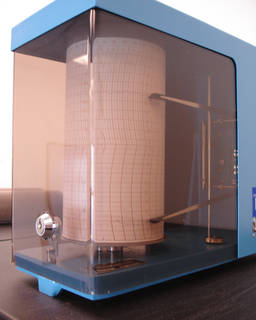
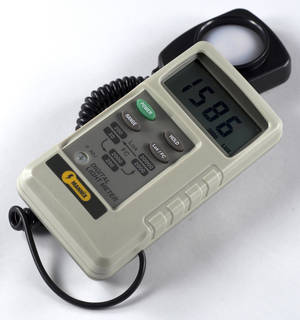
Monitoring Equipment
The quality and prices of equipment varies considerably. Though some tools have emerged as the industry standard for a given function (i.e. PEM dataloggers), keep in mind that any one of these methods below will be effective so long as you are checking and recording results consistently.
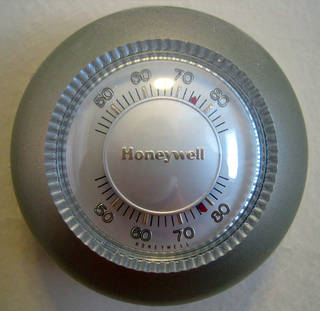
Temperature and Relative Humidity
- Datalogger
- Hygrothermograph
- Portable hygro-thermometer
Pests
- Traps (sticky and non-toxic)
- Temperature and RH monitoring should inform prevention of mold and pest population growth
Light
- Light meters
- Blue Wool test

More than high-end equipment, trained and attentive staff will go a long way in the effort to monitor across facilities and across collections spaces. Getting people to recognize the importance of a balanced and well-documented environment is the most crucial first step.
Temperature
Regulating temperature (along with humidity) is crucial for lengthening the viable lives of your collections. High temperatures will accelerate the rate of material deterioration. All damaging environmental factors are exacerbated by heat and humidity, including inherent internal flaws (residual chemicals) and external threats (air pollutants) alike. For example, photographic emulsions, prints, and writing media will oxidize more quickly, color dyes will fade more drastically, and acidic papers will yellow and embrittle at accelerated rates.
Temperature and humidity will have a mutual effect on one another. "Within certain ranges, a lower temperature can compensate for a higher RH and vice versa" (Roosa, 2002). The preservation community recognizes this (see ISO 18911; Image Permanence Institute), and, in lieu of recommending rigid temperature and RH limits, has championed target storage climate options. For example, at a cool-moderate temperature, the RH range may be 20–30%, while freezing conditions could allow for a broader range between 20–40% or more broad, depending on the materials.
Variations in temperature can cause your materials to expand and contract which can age these materials over time. It is best to keep temperatures in your facilities as steady as possible so as to lengthen the viable lives of these items. Even if you cannot maintain the ideal storage temperatures for your materials, it is still helpful to minimize the variances as much as you can.
| > 72°F (> 22°C) | Warm – Hot (Poor) |
| 65–72°F (18–22°C) | Moderate (Room Temp.) |
| 55–65°F (13–18°C) | Cool |
| 32–55°F (0–13°C) | Cold |
| < 32°F (< 0°C) | Freezing |
Remember that optimal temperature ranges are just that: ideals. They might not reflect what you are able to accomplish in your storage facilities, but the closer you can get to these conditions the better. Keep in mind that variations in temperature are what we are really trying to avoid. Keeping your materials at steady temperatures, even if imperfect, will still help grant them longer life. You should also consider how to arrange your collections. Since different formats have different needs you may consider how you can store them separately so as to properly match an item with an environment. Don't be discouraged! These conditions should be the goal that you are moving toward, even if you can't always achieve them. For more specific environmental conditions based on formats, see the respective profiles in the Collection ID Guide.

Humidity
Extreme highs, extreme lows, and fluctuating humidity will have a negative effect on materials. Relative humidity (RH) is a measure of how saturated the air is in an environment.
- A high RH will generally cause materials to swell and misshapen, as well as make conditions favorable for pest and mold growth/damage.
- A low RH often causes materials to desiccate, shrink, crack, and curl.
- RH fluctuation beyond 10% above or below a set point begins to put materials under considerable strain and at great risk, as the components will often react incongruently (e.g. photographic support and emulsion contracting and expanding at different rates).
As with temperature, rapid fluctuation is the real threat, speeding up chemical deterioration and bringing stress to collection materials over time. It is best to keep the humidity across your facilities as steady as possible. Even if you cannot maintain the best possible relative humidity levels for your materials, it is still helpful to minimize the variances as much as you can.
Generally, it is best to keep collections between 30% and 50% relative humidity. It is important to remember, however, that often when you lower the temperature, you raise the relative humidity. This is why it is critical to monitor humidity and temperature in your storage facilities. Bringing materials out of uncontrolled environments like basements, sheds, and attics and moving them into climate controlled areas like internal rooms or even closets can do much to keep these materials viable.
| < 20% RH | Extremely dry (poor) |
| 20–30% RH | Low humidity; dry (acceptable) |
| 30–50% RH | Moderate humidity; temperate (excellent) |
| 50–70% RH | High humidity; humid (poor) |
| > 70% RH | Extremely damp (very poor) |
| ± 5% RH | No risk |
| ± 10% RH | Minimal risk |
| ± 20% RH | Moderate risk |
| ± 40% RH | High risk |
Control Mechanisms: Heating, Ventilation, and Air Conditioning
The best thing you can do to protect from seasonal shifts, pollutants, and particulate matter is to have a dependable heating, ventilation, and air conditioning (HVAC) system in place. Filtration, AC, and dehumidification running on a 24-hour-a-day cycle will do more in the long run to protect items in your care than any high-end airtight enclosure could. In addition to regulating temperature and humidity, a modern HVAC system should also filter particulate matter from the environment. Just remember to change filters on a regular basis.
For many however, the cost of purchase and installation of an HVAC system in an existing space is prohibitively expensive. Room-size air conditioning units may be an achievable alternative. Temperature control will make relative humidity more easily manageable. If air conditioning is not an option, strategic placement of fans and dehumidifiers are a workable substitute to mitigate extreme temperature and humidity in your space. Do not open windows, however, as this would allow unfiltered contaminants and organisms into the environment.
| Temperature | 65–68°F (±2°) |
|---|---|
| Relative Humidity | 45–55% RH (±5%) |
Also consider the strength of your microclimates. If possible, do not place your collection materials near the window, against exterior walls, or on/near the ground. A well-sealed case can be a decent buffer from humidity and accidental leaks or spills. In seasons or geographic regions of high humidity, silica gel (or similar desiccants and humectants) can act to keep humidity at acceptable levels by absorbing moisture in these more enclosed areas. Contact a supplier or manufacturer to learn more about what your unique environment will necessitate.
To learn more about environmental control practices with regard to collection storage, see the Image Permanence Institute’s Environmental Management research and publications.
Mold and Other Pests
High temperature and humidity also heighten the potential for mold growth. Once mold takes hold of materials, especially photographic materials, it is nearly impossible to remove without permanent damage to the visual information. It is best to stay well below 60% RH and below 75°F in order to prevent mold and fungi outbreaks.
Insects and rodents, in one form or another, will undoubtedly exist in comfortable climate controlled environments. The first thing you must do is accept this—learn to look beyond the errant mouse or cockroach to see their occasional presence as normal. For the sake of collections and personal health, consider a defense alternative to fumigation and the use of harmful chemicals.
Integrated pest management (IPM) is a proactive method designed to pinpoint potential pest infestation areas and to determine whether there are facilities maintenance or operation issues that need to be improved to reduce the likelihood of a full infestation in the future. This approach essentially treats pests as symptoms of greater environmental control shortcomings (e.g. compromised building envelope, policies, HVAC system failure).
Although the process may take 1–2 years to establish, you can determine acceptable insect levels to anticipate season-by-season patterns by monitoring pest populations across the most sensitive areas of your facilities. Once a baseline has been set, staff might then be able to point to sharp upticks in a particular area and thus make a strong case (with hard data) for more meaningful and lasting repairs.
For more information, see Museum Pests by the Integrated Pest Management Working Group (IPM-WG) and the University of Illinois Library Preservation’s Integrated Pest Management program.
Light Levels
Light exposure is the primary external threat to objects on that are on display (see Exhibition Guidelines). Exposure at any level is a threat, but a high level of intensity (e.g. natural light) at long intervals will be most immediately damaging. The effects of light exposure are cumulative: short-term exposures at low intensity can add up to affect significant damage to an object. And because this fading is gradual, it is often difficult to recognize before it is too late.
Light damage is irreversible. Exposure will cause surface discoloration and severe fading that in most cases cannot be repaired. For paper, light can also weaken the internal structure, weakening and embrittling its support. All photographic materials are highly susceptible to light damage, especially color dye images. Many printing inks, writing and drawing media can altogether fade to nothing.
Measuring Light Levels
Light level measurement can range from the highly precise (and expensive) to low tech (and low cost), and there are many practical workarounds. On the high end: light meters measure visible light, while UV meters (more expensive) measure invisible UV radiation. If a UV meter cannot be procured, it is safe to assume sunlight, fluorescents, and halogen lamps will produce high UV radiation and will necessitate filters (Conn, 2012).
Another method of measuring light is through the use of Blue Wool tests, which demonstrate light damage to an array of blue-dye colourants in wool samples. By observing dye fade from exposure to a given light level for a specific length of time, you can gain an idea of appropriate exhibition intervals—or convince others at your institution that endless exhibitions are in fact damaging your collections. ISO’s Blue Wool cards are available from many archive material suppliers.
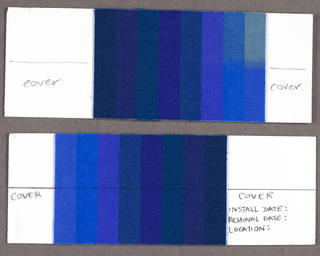
Many SLR film cameras and some DSLR (digital) cameras have built-in light meters capable of measuring light levels in a "scene." Though the quality of through-the-lens light metering will vary, most will help to provide you with a scale of high and low intensities in your space. Ultimately, for many institutions, these light readings do not necessarily have to be exact. As is the case for many quick-and-dirty methods, you will learn that doing something—however small—is better than nothing at all; use the tools at your disposal to make the most informed decisions possible.
Gaseous Pollutants and Particulate Matter
Airborne pollutants initiate chemical reactions that may stain and degrade support or base materials. They can also accelerate the fading, staining, or loss of photographic and print/writing media (e.g. sulfur dioxide, hydrogen sulfide, and ozone cause oxidation in silver images and contribute to silver mirroring or yellowing).
Sources of pollution can include:
- Emissions from the facilities
- Facilities cleaning chemicals
- Furniture and decor materials (e.g. rugs, window curtains)
- Environmental systems
- Office equipment
- Collection materials
- High traffic (people)
- Other external sources
Gaseous pollutants include sulfur dioxide, nitrogen oxides, ozone, acidic fumes, ammonia, and peroxides, just to name a few. Particulate contaminants are very fine solid or liquid particles that may lead to the soiling and abrasion of material surfaces. Particulates can include dirt, aerosols, and dust, the last of which (i.e. dust consisting of human skin, fibers, pollen) may also attract pests. Particulate matter are most easily removed from the environment by filtration systems. Most HVAC systems and furnaces have filters that help to mitigate the effects of airborne pollutants; these will need to be changed regularly.
Water Exposure
Water damage, irrespective of the cause, can cause:
- Paper staining
- Aqueous coloring/colorant bleeding,
- Coated papers and photographic materials alike to block or stick together,
- Photo emulsion to delaminate,
- Pest populations to rise, and
- Rapid mold growth.
Water damage can be minimized with the appropriate disaster planning and response infrastructures in place. See Disaster Preparedness for more information.
Resources
- Conn, D. (2012). Environment: Protection from light damage. Andover, MA: Northeast Document Conservation Center. Retrieved from: http://www.nedcc.org/free-resources/preservation-leaflets/2.-the-environment/2.4-protection-from-light-damage
- ISO. (2000). 18911 Imaging materials–Processed safety photographic films–Storage practices. Geneva, Switzerland: International Organization for Standardization.
- Roosa, M. (2002). Care, handling, and storage of photographs. International Federation of Library Associations and Institutions (IFLA) Core Programme Preservation and Conservation.
Use and Access
Control, organization, and documentation will not only keep your collections safe, but will improve long-term accessibility into the future. Policies and regulations like those outlined below that establish levels of access and use are a great start to safe-guarding collections.
Handling and Collections Care
One of the easiest areas to implement protections for collections is through careful handling and sensible collections care. The unfettered use and handling of materials heightens the general risk of damage--be it through neglectful handling (e.g. touching photo emulsion with bare hands) or irresponsible operation of access equipment. Whether intentional or not, this is a risk posed by patrons and staff alike.
Examples of neglect, mishandling, and mismanagement include:
- Pressure-sensitive (such as “Scotch®” brand) tape to mend tears.
- Permanent or volatile inks used to label documents (even the back side).
- Folding materials to fit into a given box or enclosure.
- Poor handling: Not washing and drying hands before handling fragile documents; or not using gloves when handling materials that could be damaged by contact with oils on the skin (for example: gloves must always be worn when handling metals).
- Inadequate storage or exhibit environments, such as areas with excessive climate swings or the use of poor display mounts.
- Inadequate packaging/padding for shipping
- Lack of bibliographic control over holdings, which has led to the harmful and excessive use of unique or vulnerable items.
General Recommendations:
- Use archival-quality folders, boxes, sleeves, and other enclosures to support and house materials of differing shapes and sizes. Avoid use of acidic containers such as brown paper bags and shipping or moving boxes.
- Use only Photographic Activity Test (PAT)-compliant storage enclosure materials for valuable photographic materials.
- Wear gloves (either cotton or nitrile) while handling archival photographic emulsion materials and museum objects.
- Avoid wearing cotton gloves while handling particularly fragile or slippery items, since gloves can hamper tactile senses and lead to accidentally dropping and breaking objects.
- Handle fragile materials as little as possible.
- Use clean, dry hands with carefully trimmed nails to handle materials (even when wearing gloves).
- Use both hands and ask for assistance when handling/moving oversized materials.
- Remove jewelry and accessories, including anything hanging around the neck or clothes that may inadvertently come into contact with and damage materials, such as: necklaces, headphones, glasses hanging around the neck, nametags, scarves, rings, watches, bracelets, ties, loose sleeves, and belts. Avoid wearing loose clothing.
- During transport, use enclosures, supports, book carts, and other equipment as appropriate to minimize the risk to materials. Use materials like foam and snake supports to ensure that items are supported and do not come in contact with other items or with the sides of carts during transport. Always ensure sufficient assistance while transporting items.
- Only use pencils for direct labeling (e.g. on a photo verso) of paper, AV, and photographic materials or folders/enclosures. Never use or carry pens around items and materials.
- Ensure that patrons know and understand guidelines on proper handling of all fragile materials.
- Ensure that staff, volunteers, and patrons are adequately trained in handling collection materials.
Cataloging and Description
An undocumented or poorly described collection can be especially vulnerable to theft, neglect, deterioration, improper storage, and deaccessioning. Although collecting institutions typically create formalized inventory controls and finding aids when an item/collection is accessioned, these accession records may not be authoritative, descriptive, or publicly searchable.
Why Is Description Critical to Collection Management?
- Why Is Description Critical to Collection Management?
- Without descriptive data capturing key characteristics, all materials are at greater risk of misidentification, misplacement, and improper care.
- Digital files are especially vulnerable to loss without descriptive data. These items cannot be visually browsed or skimmed like photos and other human-readable documents. Instead, the information is retrievable only through machines.
- Descriptive information makes digital and analog materials searchable for administrative and collection development purposes, and helps makes items easier to access for researchers.
- At a minimum, in order to make analog or digital items searchable, it is important to collect information about the materials. Information such as a unique identifier, title, creator, date, format, collection size, access restrictions, and use restrictions (e.g. those based on intellectual property and copyright issues) are key elements for promoting and aiding access to your holdings. At the very minimum, you should consider documenting this information. To best ensure the longevity and use of the information, it is also a very good idea to describe the collection or item using a common, well-known metadata standard (e.g. Dublin Core). For more information on descriptive metadata, refer to the Understanding Metadata section in this User Manual.
Originals and Copies
Assuming an artifact has intrinsic value, institutions must strive to maintain originals of the object along with its duplicates. "Original" here refers to the earliest generation of an object. In some cases, it will come directly from a creator’s hand (e.g. a manuscript or a unique 3-dimensional object) or straight from a capture device (e.g. a photo negative). A commercially released book, postcard, or CD therefore is not considered unique under this definition. In many instances, an organization will not know for certain whether it holds the true "original." You may have a film, photo, or document and have no idea if it is the earliest incarnation. In such cases, you must assume that it is the original and treat it as such.
Recommendations for care of original object:
- Originals should be handled as little as possible, ideally they should only be used or handled just the once in order to produce an access copy, facsimile, or surrogate;
- Copies, facsimiles, or surrogates are then put to use by the institution in place of the original, so that the copies, facsimiles, or surrogates sustain the wear and tear of prolonged exhibition or handling by patrons and researchers;
- These measures save the original from the wear and tear of use;
- For audiovisual media, successive iterations of an AV item tend to have degrading picture and sound quality, which is all the more reason to actively preserve the originals.
Examples:
- If your institution has a 16mm film, the best policy would be to transfer the film and allow the duplicate to be the viewing copy for the public;
- Display a high-resolution reproduction print of a fragile paper document rather than place it in an unprotected exhibition case.
Digital Copies
Digitization is the process by which digital copies of analog materials are made. Digitization is becoming increasingly critical as analog formats become obsolete. Making high quality digital copies for access purposes spares the originals from possible damage. However, a digitization program can be costly for an institution. This is one key reason to preserve your analog originals for as long as possible. Because digitization also requires time, effort, and periodic maintenance, it is best to plan to digitize your materials over time as part of your ongoing preservation workflow.
Digital formats have evolved quickly in a short period of time and continue to evolve. For this reason, the PSAP cannot recommend particular digital formats that are assured to be valid through the indefinite future. However, here are a few resources that can help:
- Federal Agencies Digitization Guidelines Initiative (FADGI), Still Image Working Group: outlines digital imaging frameworks and provides guidelines for sustainable formats.
- Sustainability of Digital Formats, Libarary of Congress: technical analysis of the file formats regarded as suitable for long term preservation.
- JISC Digital Media: Choosing a File Format for Digital Still Images: menu of image file formats, their factors, and the recommended applications for each.
- PRONOM, The United Kingdom's National Archives: technical registry of digital file formats, components, and software.
When choosing to digitize your AV media, here are some things to keep in mind:
- First, you will need a playback machine for each format you wish to digitize.
- Second, it is best to use non-proprietary digital formats wherever possible. Since proprietary formats are owned by companies, you could be stuck with a great number of digital objects and no software to play them with if they are no longer supported. Plan carefully or you could end up trading obsolete analog originals for obsolete digital surrogates.
- Third, it is best to digitize your materials using uncompressed formats. Compression discards information from a file in order to make it smaller and more manageable. This allows sound and video files to be more accessible and easily shared online. The problem with compression, however, is that as information is discarded, it is lost from the digital copy. Once this is done, it is not possible to recover the information. For example, when a video is digitized and compressed, some color information (along with other information) is discarded to maintain a small file size. This color information is then not included in the compressed digital copy and cannot be recovered. For best practices when digitizing an audiovisual original, choose an uncompressed, lossless format (e.g. FLAC or WAV) to make a digital master copy of the highest possible quality. You can then make smaller, compressed digital "access copies" from the digital master.
A (Very Brief) Word on Digital Preservation
It is important to remember that digital copies must also be preserved, which is no easy task. Digital objects face obsolescence at least as much as analog objects. As digital media evolve, older formats are sometimes discarded and can become difficult to support. For example, were you to have a WordStar document today, it would be hard to find a way to access that document. Digital preservation, which is a vast and burgeoning field, falls outside the scope of PSAP, and therefore PSAP does not explicitly address issues of digital preservation. For our purposes here, it should suffice to say that as you create digital surrogates of your analog originals, you will have to take steps to preserve those digital copies. Researching storage systems and digital formats will be critical to the long-term preservation of your digital materials.
Ownership and Copyright
If you are unsure whether your institution owns the rights to a particular work, it is safest to operate under the assumption that you do not. Presently, the only materials without copyright protection are those in the public domain and those where explicit permission has been granted by the rights holder. If you don't own the rights to an item and are unsure of who does, you may be able to locate the owner through the U.S. Copyright office by searching through the Copyright records.
Section 108 of the Copyright code currently provides archives and libraries with very specific and limited rights to duplicate materials for very specific preservation or access needs. However, Section 108 does not allow for unlimited duplication. For example in the case of unpublished works, the library or archives must already have a copy of the work before preservation copies can be made. For published works, libraries and archives can only make duplicates to replace a copy it has or used to have in its collection. Furthermore, these duplicates can only be made in cases where the copy has been damaged, is deteriorating, or was lost or stolen and where its format has become obsolete (Harper, 2007). Additionally, copying can only occur after effort has been made to locate the item in a current, non-obsolete format at a reasonable price.
We strongly recommend you research Section 108 prior to making duplication decisions so that you are aware of your rights. Since copyright laws are constantly in flux, it is advisable to revisit the current status of the law to ensure that provisions have not changed. The Copyright Crash Course sponsored by University of Texas' Libraries is a good resource for copyright basics as they apply to libraries and archives. For general background information, the Copyright Clearance Center does a great job of explaining the many facets of copyright law. And of course, there is also U.S. Copyright law itself.
If you do not have the rights to perform preservation measures on an item and if you do not think you can procure those rights, then this item will score slightly lower in your decision list.
Copyright and intellectual property issues are thorny, especially when considering archival materials and copying. In general, copyright grants rights holders five exclusive right to their works:
- Reproduction (the right to make a copy of the work)
- Distribution (the right to disseminate physical copies to others)
- Public performance (the right to publicly screen, broadcast, or show film through various venues including on the Internet)
- The right to prepare derivative works (for film, this generally means remakes or adaptations)
- The right of public display (public display embraces the use of frame enlargements and the presentation of video in a museum exhibit)" (NFPF, 2004, p. 77)
If your institution has secured a transfer of rights from a donor for a specific work, you still may not have the full right make the work accessible through digital systems or public presentation. In the case of film, there may be many underlying rights such as rights associated with the music in the film or to the literary work on which the film is based. In the case of audio works, some rights may be covered under federal law and also by state law. You may be able to provide access through the doctrine of Fair Use; however, this is not a fail-safe way to circumvent copyright. Before copying and making materials accessible (especially if your intent is to provide access via the Internet), be sure both to research what copyrights your materials are covered under and the ownership of those rights and to understand the provisions and risks associated with Fair Use.
Allowing Audiovisual Playback
It is best practice for institutions to create duplicates of their AV media originals for access. Some institutions, however, will not have the time or the resources to duplicate their originals. In these cases, it is best to protect the originals from wear as much as possible. To this end, we recommend that you not allow your users to play back the originals without assistance from your staff. Playback machines can put stress on all audiovisual materials, even those that are in excellent shape. Your staff have more experience with your audiovisual materials and playback equipment, and they should handle and monitor playback for your users whenever possible.
Allowing Loans
Anytime originals leave your institution, they are exposed to risk. The rigors of shipping--including temperature and humidity variations--can be very hard on your collection items. When sharing your materials with other institutions, consider sending access copies instead whenever possible. When materials leave your care, you have little to no control over how they are handled. It is best to keep your originals safely in your custody and the access copies with the borrowing institution.
Resources
- Harper, G. K. (2003, July 24-26). Copyright law and audio preservation. Paper presented at the symposium on Sound Savings: Preserving Audio Collections. Association of Research Libraries, Austin, TX. Retrieved from: http://www.arl.org/preserv/sound_savings_proceedings/Copyright_law_audio_pres.shtml
- National Film Preservation Foundation (NFPF). (2004). The Film Preservation Guide: The Basics for Archives, Libraries, and Museums. San Francisco, CA: National Film Preservation Foundation. Retrieved from: http://www.filmpreservation.org/preservation-basics/the-film-preservation-guide
Understanding Metadata
What Is Metadata?
All this talk about metadata, but what is it really? Basically, metadata is the information that helps build and provide a context for other data or information. Metadata is also often formatted in such a way that it is machine-readable, allowing data entered into one metadata standard to be shared outside of the home institution (e.g. MARC21) and to be interoperable with other institutions in some manner.
The fundamental goal of metadata is to provide a means to insure the long-term preservation of information about an institution's collections. To this end, metadata standards dictate both a specific structure for organizing and presenting information and a specific set of controlled vocabularies and technical standards that determine best practices for the format of that information.
To give a quick illustration of why both these aspects—format as well as structure—matter, let's say a string of numbers (1978-07-06) are identified as a date. Although the numbers are entered in a manner consistent with structural guidelines (i.e. they do correspond to a date), there is no way to know how to read that date without format guidelines. If you knew that the record was generated by a western European authority, you could guess that the day was entered before the month (i.e. the 7th of June). But what happens if you don't know who made the record or if you suspect that the record-maker was following American date conventions (i.e. making it the 6th of July)? By employing controlled vocabularies and technical standards, metadata schemas remove the uncertainty of data-entry in records and make data consistently and reliably legible.
Metadata Use in Libraries, Archives, Museums, and Cultural Institutions
Simply put, metadata entry is the practice of cataloguing in a digital world. The rapid development and adoption of digital information networks over the past several decades has created an endless stream of digital and analog data. While this has been a boon for education and research, it has created a demand not only for access to that data by an ever wider pool of users but also for a way to maintain and preserve that data in the long-term. This ceaseless production of new digital objects and information is produced by all sectors of society—the business world, government agencies, scientific communities, educational fields, humanities circles, and the arts. For the library and information sciences, this means that no matter what area one works in, metadata has become central to providing users the services and information that they need.
Among the many reasons why academic libraries and archives will need to provide metadata on their collections:
- NSF, NIH, and NIJ grants now require data and datasets that they fund to be preserved for long-term access by a wide range of users
- Embedded librarians and archivists will be expected to give reference to academic patrons about how they can employ metadata in their research
- Researchers will need librarians and archivists to help them maintain their data and metadata at institutional repositories
- Researchers along with other users will expect librarians and archivists to help them access other institutions' raw data, datasets, and the accompanying metadata
- Researchers will expect librarians and archivists to provide instruction on how to integrate the data produced from their own work with that of researchers at other institutions
In terms of asset and content management, metadata:
- Improves preservation and conservation efforts of digital material in terms of processing speed and quality checks
- Helps maintain provenance authority by providing documentation for your collections—and any changes made to them—over long periods of time
- Manages citation, copyright, and licensing information for data
- Helps you and your users know what is in your collection and be able to find it
- Helps you literally access objects, such as by detailing the technological and hardware requirements for one to open and play a digital audio file
- Enables quicker searches of databases and datasets since keywords and tags can be generated as part of the metadata creation process
- Saves time since maintaining rich metadata records for scientific datasets and raw data promotes longer use of the same data
Linked data connects collections to more users. For cultural heritage institutions, metadata in this way:
- Helps more people and institutions to know about your collections (e.g. EAD)
- Enables more people to access your collection both in person and at a distance (e.g. TEI)
- Encourages collaborative efforts and resource-sharing between small and large institutions (e.g. OAI-PMH)
Metadata and PSAP
To encourage the use of metadata as a best practice for collection preservation and conservation, PSAP:
- Generates metadata automatically
- Exports metadata as both EAD and Dublin Core
- Exports data from assessment reports as CSV and PDF files, which makes it compatible with ArchiveSpace and easy to integrate into many content management systems
The metadata provided by PSAP can be used to:
- Figure out the costs for current preservation and conservation needs
- Make plans for ongoing maintenance and repair of your collections
- Save time and resources by documenting conservation and preservation efforts over long periods of time
- Help you make better informed decisions about levels of access for your collections
Choosing and Adopting Metadata
When considering adopting a metadata standard, it’s important to remember that there is NOT one perfect metadata standard for any format or any collection. Instead, you will generally end up using several metadata schemas in order to properly catalogue the properties of your institution’s unique collections. In other words, you pick the right tools for the job at hand. You aren’t supposed to pick a single standard and then shoehorn what you’re cataloguing into fitting that standard.
Another important consideration is that you don’t actually have to enter every bit of information that you have on an object. It is not necessary—and indeed can be counter-productive—to create an incredibly detailed record. You only need to provide information based on what you need—and what your users need—to know, preserve, and access.
When entering dates into the PSAP application, we recommend following the guidelines established by either Dublin Core's or EAD metadata standards. Dublin Core's "date" element is either "a point or period of time associated with an event in the lifecycle of the resource." Generally, this point or period marks the resource's date of creation, NOT the date that a resource entered a repository. For EAD, which has two date-related elements, the "unitdate" element indicates "the creation year, month, or day of the described materials" while the "date" element communicates all other dates associated with a resource, such as when the resource entered a repository or when the creator of a resource died. It is preferred that you follow EAD's definition for "unitdate."
Metadata Types: Descriptive, Structural, Administrative, Technical
There are four general categories of information that metadata standards capture about the objects that they describe. Most standards are designed to primarily address one category, but there are some that integrate more. Each type of metadata fulfills an important function in preserving collection materials and their digital surrogates for future use.
- Descriptive metadata is the most like traditional cataloguing. It provides basic identifying documentation about an object, such as its title, physical measurements, and format.
- Structural metadata provides information about how different layers or aspects of complex digital objects relate to each other.
- Administrative metadata is concerned with maintaining and ensuring access to data over long periods of time. It is primarily focused on high level issues, such as information about copyright and use restrictions.
- Technical metadata is similar to administrative metadata in that it seeks to provide long-term access to data. Yet, its main goal is to provide very granular information about materials, such as documenting the exact conditions in which the data was created and noting how data has been encoded.
Common Metadata Standards
-
CDWA: “Categories for the Description of Works of Art”
Characteristics: Descriptive metadata; supported by the Getty; designed to describe art, architecture, images, and objects of material culture; compatible with the Open Archive Initiative (OAI). http://www.getty.edu/research/publications/electronic_publications/cdwa/
-
DACS: “Describing Archives: A Content Standard”
Characteristics: Descriptive metadata; supported by the Society of American Archivists; designed to describe archival collections. http://files.archivists.org/pubs/DACS2E-2013_v0315.pdf -
DC: “Dublin Core”
Characteristics: Descriptive metadata; supported by the Dublin Core Metadata Initiative; designed to be general format to document all resources; compatible with OAI-PMH harvesting, XML encoding, and many content management systems (CMS). http://dublincore.org/ -
EAD: “Encoded Archival Description”
Characteristics: Descriptive metadata; supported by the Library of Congress; designed to use XML to markup archival finding aids and to share collections. http://www.loc.gov/ead/ -
MARC21: “Machine-Readable Cataloging”
Characteristics: Descriptive metadata; supported by the Library of Congress; designed for electronic bibliographic cataloging records in libraries. http://www.loc.gov/marc/ -
METS: “Metadata Encoding and Transmission Standard”
Characteristics: Descriptive, administrative, and structural metadata; supported by the Library of Congress; designed for complex objects in digital libraries. http://www.loc.gov/standards/mets/ -
MIX: “Metadata for Images in XML”
Characteristics: Technical metadata; supported by the Library of Congress; designed for use with digital still images. http://www.loc.gov/standards/mix// -
MODS: “Metadata Object Description Standard”
Characteristics: Descriptive metadata; supported by the Library of Congress; designed to integrate MARC records with new data and to rely on XML markup. http://www.loc.gov/standards/mods/ -
PBCore: “Public Broadcasting Metadata Dictionary Project”
Characteristics: Descriptive, administrative, and technical metadata; supported by the Corporation for Public Broadcasting; designed for audiovisual media files and materials. http://pbcore.org/ -
PREMIS: “Preservation Metadata: Implementation Strategies”
Characteristics: Administrative, technical, and descriptive metadata; supported by Library of Congress; designed for the preservation of digital resources. http://www.loc.gov/standards/premis/ -
TEI: “Text Encoding Initiative”
Characteristics: Technical metadata; supported by the Text Encoding Initiative Consortium; designed for use encoding machine-readable texts in XML. http://www.tei-c.org/index.xml -
VRAcore: “Visual Resources Association Core Categories”
Characteristics: Descriptive metadata; supported by the Library of Congress; designed to describe a visual work and its representations.http://www.loc.gov/standards/vracore/
Resources
http://www.ala.org/tools/atoz/metadata/metadata —ALA site on metadata.
http://www2.archivists.org/groups/metadata-and-digital-object-roundtable —SAA’s division for metadata and digital information.
http://www.getty.edu/research/publications/electronic_publications/intrometadata/crosswalks.html —The Getty provides a map to crosswalk metadata between CDWA and a number of other common schemas.
http://www.loc.gov/standards/ —The Library of Congress’ starting page for metadata information.
http://www.loc.gov/marc/marcdocz.html —Information from the Library of Congress for mapping DC to MARC 21.
http://www.loc.gov/standards/marcxml/ —XSLT stylesheet to convert DC into MARCXML.
http://www.loc.gov/standards/mods/mods-conversions.html —Stylesheet to convert DC into MODS.
http://marcedit.reeset.net/downloads —XSLT stylesheet to convert EAD into MARC21XML.
http://metadata.teldap.tw/standard/mapping-foreign_eng.htm —Site contains links to help crosswalk DC metadata.
http://www.sewallbelmont.org/wp-content/uploads/2011/02/SBHM-Metadata-Plan.pdf —Site provides a crosswalk between PastPerfect and Dublin Core elements.
Exhibition Guidelines
Many cultural heritage institutions include display of their collections as part of their mission. The importance of exhibiting objects must be weighed against the irreversible damage that is caused during display. The longer an item is on exhibit, the greater the risk of physical damage, such as through exposure to light and fluctuating environmental elements. The duration of any exhibit should therefore be determined in advance, and no item should be placed on permanent display. Alternatively, consider using facsimiles, copies, or items of low artifactual value for long-term exhibits.
An ideal, safe exhibition duration is between 3–4 months for most items, assuming that other conditions such as light, temperature, and relative humidity are within acceptable ranges. Many institutions however may find this goal unrealistic and will have to consider their limits. Regardless of duration, an object should be returned between display periods to an appropriate storage environment, preferably in climate-controlled dark storage.
Light damage is irreversible and accumulates gradually. Color fading from light exposure is often difficult to recognize. Taking time to measure UV light intensity in a given space is useful, and there are practical approaches that any institution can use to curb intensity and minimize exposure.
Light levels should be kept as low as possible. When on display, objects should be protected from exposure to natural light, which contains high levels of UV radiation. Shades, curtains, or filters applied directly to windows will help to minimize sunlight. Natural light, fluorescents, and halogen lamps produce high UV radiation and will require filtering. Lighting should never be placed inside a display case, as it can create dangerous levels of light and heat for objects.
Depending on the types of materials being displayed, consider whether a vented, unvented, or sealed and RH conditioned case is best. Consider using lockable cases for high value items and monitoring exhibit spaces when visitors are present.
Framing and matting materials should be preservation-quality and known to have passed the Photographic Activity Test (ISO18916). Mounts should be reversible, that is, capable of being undone; avoid tape and adhesives whenever possible.
Whenever possible, obtain and maintain a record of an item’s exhibition history in order to track any damage or deterioration that may have occurred and to plan for the item’s future handling and exhibit durations. For instance, it is ill advised to move an item directly from one exhibit to another, since exposure to adverse environmental conditions is more likely while on display and extended light exposure may result in irreparable damage.
Use of Facsimiles or Copies
In order to minimize the inherent risk in exhibition, consider displaying copies. This is an effective strategy for 2-D artifacts, especially for fragile photographs and unbound paper documents. High resolution scanning, laser printing, and other modes of high-quality copying enable the creation of very convincing facsimiles for more fragile objects going on view. Some organizations, however, may not find this to be a good fit for their mission or policies.
Light
Light exposure is the primary external threat to objects on display. Exposure at any level is a threat, but a high level of intensity (e.g. natural light) will be most immediately damaging. The effects of light exposure are cumulative: short-term exposures at low intensity can add up to affect significant damage to an object. Since fading is gradual, it is often difficult to recognize before it is too late. See Monitoring Light Levels below to learn about practical light measurement.
Light damage is irreversible. Exposure will cause surface discoloration and severe fading that in most cases cannot be repaired. For paper, light can also weaken the internal structure, weakening and embrittling its support. All photographic materials are highly susceptible to light damage, especially color dye images. Many printing inks for writing and drawing media can altogether fade to invisibility. Although glass, stone, ceramic, and metal objects are generally not light-sensitive, in certain cases exposure to light can further damage or weaken sensitive objects. When in doubt, minimize exposure to light for these objects.
| Light Sensitivity | Format/Process/Media |
|---|---|
| Extreme Sensitivity: Display a facsimile | |
| Autochrome | |
| Ferro-gallic print | |
| Newsprint | |
| High Sensitivity: 5,000 ft-c hours (50,000 lux hours) per year; 3-year rest between displays | |
| Daguerreotype | |
| Ambrotype | |
| Tintype | |
| Cyanotype | |
| Diazotype | |
| Photostat | |
| Carbro print (color) | |
| Chromogenic color print | |
| Inkjet print | |
| Instant photo | |
| Dye transfer print | |
| Aniline dye-based media | |
| Felt-tip pen inks (including black) | |
| Ball-point pen inks (red, blue) | |
| Paper tinting dyes | |
| Moderate Sensitivity: 10,000 ft-c hours (100,000 lux hours) per year; 2-year rest between displays | |
| Silver dye bleach print (cibachrome) | |
| Salted paper print | |
| Albumen print | |
| Collodion print | |
| Matte collodion print | |
| Gelatin POP print | |
| Platinum/palladium print | |
| Silver gelatin print (RC paper) | |
| Low Sensitivity: 30,000+ ft-c hours (300,000 lux hours) per year; 1-year rest between displays | |
| Silver gelatin print (fiber-based) | |
| Carbon print | |
| Letterpress halftone | |
| Lithography | |
| Photogravure | |
| Collotype | |
| Woodburytype | |
| Carbon-based inks/media (black printing ink) |
UV Light
Avoid all ultraviolet light. Invisible ultraviolet (UV) radiation is the most damaging of light frequencies. Eliminate needless exposure to sources rich in UV output (e.g. sunlight, fluorescents, tungsten-halogen lamps). Begin with natural daylight. When sunlight is a factor, place blinds, screens, and/or UV filters over the windows. UV-filtering sheeting (plastic film) and panels (plexiglass or glass) should have a blocking capacity of 90% or higher. UV-filtering products trade names include Plexiglas, Lucite, Acrylite, Lexan, Makrolon, and Perspex. Check manufacturer specifications and be aware of color distortion and capacity ratings.
Artificial light sources should be switched off when visitors are not present. Consider the use of dimmer switches and/or motion detectors to help regulate when lights are on/off. UV filters are crucial in cases of high UV output.
| Light Source | Level of UV Intensity |
|---|---|
| Sunlight | VERY HIGH (about 400-600 μW/lm, possibly higher) |
| Fluorescent | MODERATE to HIGH (75-150 μW/lm) |
| Halogen | MODERATE (100-200 μW/lm), or LOW if labelled "UV-STOP" (40 μW/lm) |
| Tungsten | MODERATE to LOW (about 75 μW/lm) |
| Sunlight w/ adequate UV-filter | LOW (75 μW/lm and under) |
| LED | VERY LOW (0-75 μW/lm) |
Infrared Energy (Heat)
Heat—generated primarily by sunlight and tungsten light—will be retained in closed cases and frame packages, causing significant harm to most exhibition items. Paper and photographic materials can dry out, warp, discolor, and suffer structural damages. Even with UV filters, these items will sustain damage from invisible infrared energy exposure. This is all the more reason to avoid long-term and/or frequent exhibitions.
Artificial Lighting
Regardless of the light source, it must be kept at the lowest level necessary. A dimmer is recommended (diffused light will go further) and should emit little to no UV:
- Fluorescent: Fluorescent lights produce the most UV rays of any artificial source. Furthermore, they cannot be dimmed. But fluorescent lamps are common, relatively long-lasting, and low UV output tubes (0.5–2%) are available. Any tube intended for an exhibit space should be covered with a plastic UV-filtering sleeve. The sleeve should be long enough to cover both ends of the tube, from which much of the UV energy is emitted. The filtering agent fades over time, so replacement of the sleeve will be necessary every 5–10 years.
- Tungsten (Incandescent): With little or no UV output and an ability to be dimmed, incandescents are considered suitable. However, incandescent lighting will generate significant heat. Avoid placement in a display case or in close proximity to exhibition items. Ventilation and distancing are best. Use a dimmer: at full capacity, lights are needlessly bright and emit considerable infrared energy.
- Halogen (Incandescents): tungsten halogen, quartz-iodine, quartz-halogen): Very common in museums today, halogen lamps can be dimmed and are qualitatively similar to incandescents. Unfiltered, these give off slightly more UV than most incandescents. Before installation, lamps should be outfitted with the appropriate filters, which are often included with the fixture. Bulbs labelled "UV-STOP" will emit far less. Halogen bulbs can generate high heat and are known to be combustible.
- LED: Increasingly popular in the museum community, LEDs (Light Emitting Diodes) emit very low UV and little infrared radiation. LED have a long lifetime. Bulbs are slightly warm to the touch, so consideration should be given for enclosed environments. Some take issue with its color rendering, so try before you buy, if possible. LEDs have a tendency to flicker, so check at several settings with the appropriate switch and transformer. In compact exhibit spaces, the dimmer’s level of control should be dependably high. For more info regarding the use of LED lighting in exhibition spaces, see Druzik & Michalski's guidelines for selecting solid-state lighting for museums.
Simple and practical action should also help to curb light exposure. Turn out lights when visitors are not present in the viewing area. Dim the lights. When closed, cover displays with light-blocking cloth.
Monitoring Light Levels
Light level measurement tools range from highly precise and expensive to low tech and low cost, and there are many practical workarounds. On the high end: light meters measure visible light, while the more expensive UV meters measure invisible UV radiation. If a UV meter cannot be procured, it is safe to assume sunlight, fluorescents, and halogen lamps will produce high UV radiation and will necessitate filters.
Another method of measuring light is through the use of Blue Wool tests, which demonstrate light damage to an array of blue-dye colourants in wool samples. By observing dye fade from exposure to a given light level for a specific length of time, you can gain an idea of appropriate exhibition intervals—or convince others at your institution that endless exhibitions are in fact damaging your collections. ISO’s Blue Wool cards are available from many archive material suppliers.
Many SLR film cameras and some DSLR (digital) cameras have built-in light meters capable of measuring light levels in a "scene." Although the quality of through-the-lens light metering will vary, most meters will help to provide you with a scale of high and low intensities in your space. Ultimately, for many institutions, these light readings do not necessarily have to be exact. As is the case for many quick-and-dirty methods, doing something--however small--is better than nothing at all; use the tools at your disposal to make the most informed decisions possible.
Macro-Environments/Micro-Environments
The best thing one can do to protect from seasonal shifts, pollutants, and particulate matter is to have a dependable heating, ventilation, and air conditioning (HVAC) system in place. Filtration, AC, and dehumidification running on a 24-hour-a-day cycle will do more in the long run to protect items in your care than any high-end airtight enclosure could. If air conditioning is not an option, strategic placement of fans and dehumidifiers are a workable substitute to mitigate extreme temperature and humidity in your space.
| Temperature | 65–68°F (±2°) |
|---|---|
| Relative Humidity | 45–55% RH (±5%) |
Also consider the control strength of your micro-environments: rooms, display cases, vitrines, or box enclosures. A well-sealed case can be a decent buffer from humidity. But in seasons or geographic regions of high humidity, silica gel or similar desiccants or humectants can act to keep humidity in this microclimate at acceptable levels by absorbing moisture. Contact a supplier or manufacturer to learn more about what your unique environment will necessitate.
Handling & Preparation
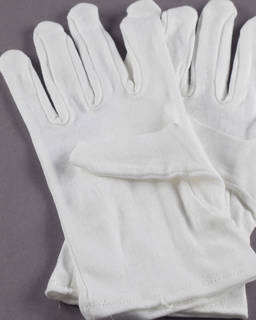
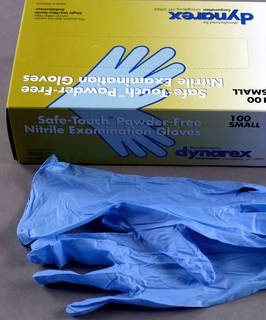
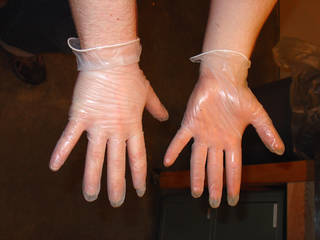
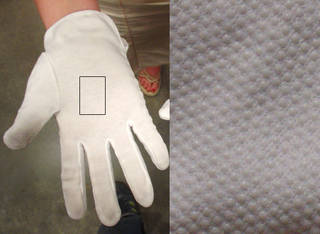
Certain items, such as photographs and film, should be handled while wearing white cotton gloves; this protects the emulsion and prevents fingerprints from being left on the image surface, which can oxidize and cause permanent damage. For most photographic materials (particularly those with an emulsion), it is best to wear nitrile gloves or archival cotton gloves in order to prevent transfer of acidic oils onto the surface. Nitrile or vinyl gloves are a suitable and often preferable alternative to cotton gloves.
In most instances, white cotton gloves are not recommended for handling book and paper, glass, and/or ceramic items, since they may snag on fragile pages and delicate fragments, attract dirt and oils, and limit the user’s tactile experience. If not using gloves, staff and patrons should wash their hands thoroughly before handling books and paper.
If handling slippery and/or fragile glass or ceramic objects, nitrile and vinyl gloves are recommended over cotton gloves. If the glass or ceramic object is stable and not soft, cotton gloves with friction dots can help improve grip. It is absolutely necessary to wear gloves of some kind when handling metal objects to protect the object and the handler from hazards.
Not all gloves are created equal. Certain gloves are suited to handling specific types of materials. Before choosing gloves, it is important to consider the following:
- Cotton gloves: Often available with rubber nubs (“friction dots”) to increase friction against items and improve grip. Friction dots can damage soft stone or ceramic surfaces. Cotton can deposit fibers onto material and can snag due to the weave of fabric and loose fit of the glove.
- Nitrile gloves: Are stable (unlikely to disintegrate) and allow for a reasonable grip. However, they may be too loose to handle extremely detailed or fragile items and they may tarnish silver items.
- Vinyl gloves: Can easily degrade. Typically considered inferior to nitrile gloves but may be an acceptable substitute for items that cannot be handled with bare hands when nitrile gloves are not available.
- Nylon gloves: Are often available with rubber nubs to increase friction against item and improve grip. However, these nubs (or “friction dots”) can damage soft stone or ceramic surfaces. Typically, they fit tighter than cotton gloves.
- Latex/Rubber gloves: Fit more tightly, but they degrade quickly and are easily torn. Latex/rubber gloves can damage metal surfaces. Many people also have allergies to latex. For these reasons, latex/rubber gloves are not recommended.
Remember that gloves not only protect materials from coming in contact with dirt or oils in skin, but they also protect the wearer from coming in contact with chemicals and potential hazards! We advise that, whatever glove type you use, it is best to use clean gloves that fit and are free of holes or tears.
Display Enclosures & Materials
Enclosures should be used to protect collection materials from airborne pollutants, physical contact, and the extremes of environmental shifts. Be sure that your display enclosure is larger than the object to be displayed. Never fold or trim an object to fit! Display materials must also be chosen carefully. Some woods, paints, sealants, adhesives, hardware, and display fabrics can emit harmful airborne pollutants affecting paper structure, photographic silver images, and object materials.
Wood Cases
Wooden display cases are generally not recommended as they can pose a threat to materials due to the volatile off-gassing that results from their degradation. However, sealing wood will help to reduce these gaseous emissions.
Sealants and Paints: Avoid oil-based sealants and paints. Always elect for low VOC (volatile organic compound) or non-toxic paints and sealants, if possible. Recommended sealants and paints include:
- Sealant: Water-based polyurethane or two-part epoxy sealant
- Paint: Acrylic or latex paint, but first use two-part epoxy as sealant
Wood Materials: Plywood, fiberboard, other composite materials should be avoided as they are likely treated with acids, adhesives, and/or formaldehyde. Oak, which is the most naturally acidic of solid woods, must also be avoided. Some softwoods, such as poplar and basswood, are admissible. As a general rule, artifacts should not come into direct contact with wood surfaces!
Framing
Even the most stable display item can be damaged if framed tightly with low-quality materials. UV-filtering glazing/glass is recommended for any framing package, especially those that block over 97% of UV energy. Buffered (alkaline) mats and mounts are recommended, as frames tend to house items after exhibition. Non-adhesive and hinge pressure systems using nonreactive paperboard are preferable. Aluminum framing is ideal because it is inert. Wood frames may be unavoidable. If so, some sealing (PAT-approved) will be necessary. Sealing the edge of the frame package from the wood frame material with polyester tape should help to limit harm of an off-gassing wood frame.

Mounting
All mounting techniques should ideally gently support the piece, should be removable, and should not alter the condition of the items they display. Providing proper support is particularly important for objects made of heavy materials, like stone, ceramic, glass, and metal. Non-adhesive mounting is preferable, and tape should never be used. Sheet items can be attached to rag paper (100% cotton paper) or other two-ply archival quality (acid-free) display backing cut to the same size or larger than the item. Transparent corner supports (polyester photo corners and corner strips, available from most archival supply houses) or hinged window mats are commonly used to fix the item to the mount. Exhibitors should use their own judgment, but most mount methods have well-documented standards.
Avoid tape and adhesives if possible. These materials often release acids and should be assumed destructive to your collections. Some "archival" tape or glue can also cause damage, so do your homework before using it.
Encapsulation
Single sheet or thin pamphlet items may be encapsulated in polyester film, which helps to protect and structurally support objects.
Recommended Material(s): Uncoated polyester (Melinex type 516, Mylar type D)
Encapsulation should not be confused with lamination, which is inadvisable in any situation where long-term preservation is of concern (see Lamination/Encapsulation). Encapsulation involves sealing the edges of two sheets of polyester to enclose an item, and it allows for the item to be removed simply by cutting open the polyester enclosure. Encapsulation methods include ultrasonic or thermal welding (ideal but expensive), zig-zagged cloth stitching, and double-sided tape (no. 415). The adhesive tape method is not recommended for heavy and/or thick items. You should also avoid adhesive tape in warm environments.
Highly acidic items are known to deteriorate more rapidly when in a polyester sleeve or other containment. In such cases, deacidification or washing will have to be performed by a professional prior to encapsulation. In lieu of this conservation work, an alkaline buffer sheet may be placed with the object to slow the acid degradation.
Displaying Cloth and Fabric
Cotton, linen, polyester, and cotton-polyester blends are recommended over silk (acidic) and wool (emits sulphur compounds) fabrics. Avoid wrinkle-free and fire retardant fabrics. Wash any fabric before using in a display arrangement. Dyed cloth should be washed until all dyes are removed.
Security
Be aware of placement and visibility in your space when designing exhibits. Objects are at heightened risk of theft when on display. Security measures can also be established in to prevent this at your institution. Items of high value should be placed in locked display cases. Also consider using secondary wall mounts or harnesses for framed items of high value. The more effort it takes to remove from the wall, the less likely it is to be stolen or damaged. Small objects, like coins and arrowheads, which are easy to conceal in clothing, are particularly vulnerable to theft. If security staff is not a feasible option, consider introducing exhibit space monitor shifts.
Displaying Books and Bound Material
Books and pamphlets should be displayed horizontally or at a gentle angle. Do not display an open book beyond its comfort angle, which is generally 30–45°. Anything else may cause warping or weakened binding. Open volumes should never be displayed flat at 180°. A book cradle or wedge can be ordered to spec or can be fabricated in-house, typically from molded acrylic, folded board, or polyethylene foam. In addition to limited exhibition and item rotation, simply turning the pages regularly should curtail light damage and structural damage.
Resources
- Casterline, G.F. (1980). Archives & manuscripts: Exhibits. Chicago, IL: Society of American Archivists. Retrieved from: http://babel.hathitrust.org/cgi/pt?id=mdp.39015008929724;view=1up;seq=5
- Conn, D. (2012). Environment: Protection from light damage. Andover, MA: Northeast Document Conservation Center. Retrieved from: http://www.nedcc.org/free-resources/preservation-leaflets/2.-the-environment/2.4-protection-from-light-damage
- Dean, D. (1994). Museum exhibition: Theory and practice. London, England: Routledge.
- Druzik, J.R. & Michalski, S.W. (2011). Guidelines for selecting solid-state lighting for museums. Retrieved from: http://www.connectingtocollections.org/wp-content/uploads/2011/08/SSL-Guidelines-Ver.-10.0.pdf
- Glaser, M.T. (n.d.). Protecting paper and book collections during exhibition. Andover, MA: Northeast Document Conservation Center. Retrieved from:http://www.nedcc.org/free-resources/preservation-leaflets/2.-the-environment/2.5-protecting-paper-and-book-collections-during-exhibition
- ISO. (2007). 18916 Imaging materials: Processed imaging materials–Photographic activity test for enclosure materials. Geneva, Switzerland: International Organization for Standardization.
- Michalski, S. (n.d.) Agent of deterioration: Light, ultraviolet and infrared. Canadian Conservation Institute. Retrieved from: http://canada.pch.gc.ca/eng/1444925073140
- Nicholson, C. (1992). What exhibits can do to your collection. Restaurator, 13(3), 95–113.
- Wagner, S., McCabe, C., & Lemmen, B. (2009). Guidelines for exhibition light levels for photographic materials. In D.H. Norris & J.J. Gutierrez (Eds.), Issues in the Conservation of Photographs (684-690). Los Angeles, CA: Getty Conservation Institute.
- Wilhelm, H. & Brower, C. (1993). The permanence and care of color photographs: Traditional and digital color prints, color negatives, slides, and motion pictures. Grinnell, IA: Preservation Publishing Company. Retrieved from: http://wilhelm-research.com/pdf/HW_Book_761_Pages_HiRes_v1c.pdf
Collection Development Policy
No matter what size the institution—from an all-volunteer, small town historical society with limited financial resources to a nationally recognized museum with an annual budget in the millions of dollars—there are a great many benefits to a well-written, practical collection development policy.
A collection development policy defines the scope of an institution’s holdings, specifically by detailing what an institution (museum, library, archive, historical society, etc.) collects. Even more importantly, it also details why it collects certain things and not others. A good policy sets collecting priorities and thus improves the depth and breadth of items and objects in collections over time. A collection policy also enables an institution’s governing authority or board to fulfill its fiduciary and stewardship responsibilities.
It is often the case that well-intentioned, yet misguided donors will assume their local historical society collects any and all "old" books, photographs, maps, correspondence, and other items and objects, regardless of their condition or provenance. Yet no one institution can afford to accept donations in a haphazard manner. It would be a mistake, for example, for a small county historical society to accept any item or object from any time period or location. Storage space for most institutions (small and large, rich and poor) is usually at a premium, and such practices would place undue strain on staffing and financial resources.
A collection policy obligates an institution and its staff to ask questions integral to its mission, vision, ethics statement, and overall sense of purpose: Should a small town museum or library in Idaho, for instance, need to collect, preserve, catalog and store a large collection of photographs of the Manhattan skyline? What if the photos were taken by an amateur photographer who once lived in that Idaho town? A collection development policy can answer these and other questions, including: Will this donation prove helpful to visitors making use of our resources? Will this donation help us better tell the stories we want to tell?
A common mistake when embarking on collection development is to draft a policy based on protecting (or giving precedence to) current collections regardless of their utility to the institution’s overall mission or purpose. Such an approach would only compound existing institutional biases. Once a clearly written collection development policy is complete and approved, be prepared to deaccession items and objects. Although it is often difficult to deaccession long-held material, hard choices can improve the cohesiveness of the remaining collection and create space for new acquisitions.
Finally although it may seem counterintuitive, the process of writing and implementing a collection development policy can be as important as the policy itself. This process can greatly improve staff and volunteer understanding and appreciation of the institution’s responsibilities to its "shareholders," including its governing authority or board, members, visitors, and the public at large. An institution’s collection policy should reinforce and inform the institution’s mission or vision statement by providing answers to two basic questions: Why are we here, and what are we trying to accomplish?
Further Reading
Each institution has unique collections and unique challenges and opportunities, and thus every policy will be likewise unique. That said, many collecting institutions have placed their development and/or management collection policies online. Examining other policies online or, better yet, talking directly with staff from peer institutions, will undoubtedly prove helpful. In addition, national organizations such as the American Alliance of Museums (AAM) and the American Library Association (ALA) have online guides to developing and managing collections:
American Alliance of Museums (AAM)
Alliance reference guide: Developing a collections management policy
American Library Association (ALA)
Local History Committee of the History Section, Reference and Adult Services Association
RUSA guidelines for establishing local history collections
Resources
- American Alliance of Museums. (2012). Alliance reference guide: Developing a collections management policy. Retrieved July 10, 2014, from http://www.aam-us.org/docs/continuum/developing-a-cmp-final.pdf?sfvrsn=2
- American Library Association, Local History Committee of the History Section, Reference and Adult Services Association. (2012). RUSA guidelines for establishing local history collections. Retrieved July 10, 2014, from http://www.ala.org/rusa/resources/guidelines/guidelinesestablishing
- Harden, J.J. (2001). Saving the past for the future! Part 1: Deciding what to save for a local history collection. Colorado Libraries, 27(4), 43-44.
- Harden, J.J. (2001). Saving the past for the future! Deciding what to save, part 2: Preserving what is saved. Colorado Libraries, 29(3), 44-46.
- International Federation of Library Associations, Institutions Section on Acquisitions and Collection Development. (2001). Guidelines for a collection development policy using the conspectus model. Retrieved July 30, 2014 from: http://www.ifla.org/files/assets/acquisition-collection-development/publications/gcdp-en.pdf
- Library of Congress. (n.d.). Collection development and policies. Retrieved July 30, 2014 from: http://www.loc.gov/acq/devpol/
- Simmons, J.E. (2006). Things great and small: Collections management policies. Washington, DC: American Association of Museums.
Disaster Preparedness
Disaster Recovery Plan
A disaster recovery plan establishes how an institution will respond to a range of disasters. Creating a plan involves risk assessment, asking what could go wrong, how likely is it, and what would result? Review risks to your building and collections by systematically examining facilities from top to bottom and from outside in. Note areas where mitigation might prevent damage. The plan should delineate, among other things, how you will treat your materials if they are exposed to flooding, fire, smoke, storms, vandalism, building systems failure, and other disasters. Having a disaster plan in place before a disaster strikes can make your response much more effective, and it can potentially keep a bad situation from becoming much worse.
A disaster plan should include information about:
- How to prevent a disaster. Monitor your facilities and mechanical systems. Provide staff with the necessary information that will help them to make informed decisions about the placement of materials and how to prepare for the worst (fires, floods, etc.). For example, you might include information about the location of fire extinguishers and emergency response kits, and you can direct them to never store items on the floor or below exposed pipes.
- When disaster strikes. Maintain an emergency contact list containing both staff and volunteer phone numbers and email addresses, along with a simple checklist of preemptive actions, e.g. move boxes, cover collections, sandbag the backdoor, etc. In anticipation of a forecasted natural disaster, communicate with your staff and emergency volunteers to establish an accurate estimate of manpower as well as to give them fair notice.
- Post-disaster recovery procedures. If a collection sustains water damage, there is a short amount of time to take action to prevent harm. Mold grows after 48 hours in environmental conditions above 65% relative humidity and 70°F. Photographic materials need to be treated within 72 hours as photo emulsions may soften and dissolve, and stacked photos may meld together.
- Materials requiring special protection or treatment, ideally as a prioritized list. This requires a high-level understanding of your collections. Of course your high priorities will include collection material of significant cultural and/or monetary value to your organization, but also your organization’s unique administrative records, catalogs, and/or finding aids.
- Suppliers, conservators, and available services. There are many professionals better-equipped and at the ready to jump into action when there is little time to lose. Keep a list of contact information for servicers and emergency responders both local and beyond. Do the research now and form a relationship with these resource providers prior to disaster. This will help your organization to act swiftly and effectively.
- Staff and volunteer responders. In addition to an emergency contact list (with multiple phone numbers and email addresses), document information about staff’s general availability to determine the flow of communication (e.g. phone tree, emails, mass text messages) and inform scheduling in preparation for events.
Make a concerted effort to keep the disaster plan current, especially when it comes to names and contact information. Annual revision, redistribution, and group review of the document is a good strategy. The more copies out there—online, in print, in the hands of staff, in your building, and even at home—the stronger your organization’s line of communication will be when disaster strikes. And perhaps just as important as having the plan is drilling and practicing the plan semi-regularly. It is crucial to keep the current plan readily accessible and familiar. Disaster waits for no one. The fate of your collections depend on your ability to act with vigilance.
dPlan and dPlan Lite are excellent online tools that can guide you through the process of generating a disaster recovery plan: http://www.dplan.org/. A disaster plan should outline responsibilities and teams to whom they are assigned, along with alternate contacts. In the event of a disaster, flexibility will crucial as many will not be available. Also specify what materials have priority with regard to evacuation and recovery (NFPF, 2004). Using the PSAP to assess your materials can help you to generate a prioritized list of what materials will need attention in the event of a disaster.
Format-Specific Recovery Plan
Many photographic, audiovisual, and special collections materials will be particularly susceptible to incidental damages. When crafting a disaster plan, be sure to speak to the protection and salvage of these distinct, fragile items. Some basic tips to consider: first, do not store your valuable original materials in a basement or any area prone to leaking. Basements take on water during floods and storms. You want to make sure your materials are in a humidity and temperature-controlled environment—above the basement level, if possible. Secondly, if a basement is unavoidable and you are storing materials on shelving, it is best to keep the materials off of the bottom two or three shelves. This will help to minimize their exposure to flood waters. It is also a good idea to store materials as far from water pipes (particularly those in your ceiling) as possible to help prevent damage in the event of a water leak. Having fire extinguishers available nearby is also a good policy.
AV materials are often difficult, if not impossible, to treat in-house in the event of a disaster. To further complicate matters, the various formats have different needs in terms of disaster recovery and cleaning. It is best to turn the materials over to experts to avoid further damage.
Access to Disaster Recovery Tools
In the event of a disaster, it is ideal to have contact information for the disaster recovery services at hand. Maintain a current list for servicers and emergency responders both local and beyond. Do the homework now: form a relationship with these resource providers prior to disaster. This should help your organization to act swiftly and effectively.
Disaster Recovery Services/Vendors
The Preservation Self-Assessment Program assumes no responsibility for the professionalism of any of the vendors and consultants listed by or related to these resources. These lists are not meant to endorse, recommend, or require use of any private vendor/consultant, nor does omission indicate censure.
-
Florida Department of State, Division of Library and Information Services.
http://dlis.dos.state.fl.us/DisasterRecovery/vendors.cfm -
National Archives and Records Administration (NARA). List encompasses salvage of records and disaster recovery vendors.
http://www.archives.gov/preservation/disaster-response/vendors.html - Northeast Document Conservation Center (NEDCC). NEDCC maintains a great list of disaster recovery vendors, but frequently change URLs. Search NEDCC’s website at www.nedcc.org for more information.
-
New York State Archives. A list of disaster recovery vendors to aid government agencies, local governments, and other similar entities.
http://www.archives.nysed.gov/records/mr-disaster-vendors
Fire Detection
Fire is one of the most damaging disasters to a repository. Having fire detection systems throughout every storage facility is critical in order to help prevent loss. Good smoke detectors and heat detectors can alert staff before a fire gets large enough to set off the fire suppression system. This can give staff time to put out the fire before materials are exposed to the water or chemicals dispersed by the fire suppression system. Detection systems should be tested regularly to make sure they are functional.

Fire Suppression
Fire suppression systems are critical in a storage area. There are many types of fire suppression systems, but the most common are water sprinkler systems. Any system will have its benefits and drawbacks.
Water sprinklers are cheaper to install, maintain, and upgrade. However, repositories are often concerned about water sprinklers because it is assumed that these systems tend to turn all the sprinklers on in the event of a fire, causing more widespread water damage to collections than necessary. Research however has proved this to be untrue. In fact, sprinkler systems tend to be able to focus their fire suppression very closely by turning on only a sprinkler or two over the fire (Artim, 1993).
In particular, there are two types of water sprinkler systems: the wet pipe and the dry pipe. The wet pipe system is the most common type as it is easier to install, maintain, and respond to fires. The dry pipe sprinkler system is used when the risk of pipe freezing is significant. These systems can be costly to install and are prone to corrosion and valve failure. In addition, their effectiveness is limited because of the delay in response, which is a critical factor. The first minutes of a fire are when it can quickly get out of control.
Halon systems have been preferred by many institutions because halon gas can extinguish fires without leaving any damaging residue. Halon systems were once widely used, but are no longer being manufactured due to environmental and safety concerns. Organizations with existing halon systems may use them, but they cannot be replenished. They were expensive to maintain as well; the supply of halon gas was costly to replace. Halon-protected rooms must maintain airtight seals as gas will flow to other areas of the building if there are passages.

Institutions should not fear water systems. When properly maintained, they can be very effective and minimally damaging to collections. Compared to fire, which can completely destroy collections, water damage to materials is often not the end of the world for your collections. There are many effective techniques for treating water damage, and there are several excellent disaster recovery specialists that can help, should sprinklers drench your materials.
Whatever system you choose for your institution, proper maintenance and upgrades are critical to maintain the long-term effectiveness of your fire suppression system. It is also very important that you check with your local building codes to see what you will be allowed to use in your facility. Some states or counties have laws that restrict the kinds of chemicals that can be used in your fire suppression systems.
Having easily accessible hand fire extinguishers throughout your storage facilities is critical when responding to a fire. Extinguishers should be recharged and/or inspected regularly to make sure they are functional. Additionally, staff should be trained for correct usage of your particular fire extinguisher model(s) as well as for when not to use it. The most important factor is personal safety: alert your fire department before anything else, and know when to just get out of the building.
Water Drainage
Standing water can be very hazardous to your collections, especially those stored on the floor or on lower shelves. Water can break down materials and encourage mold growth. As a rule it is best to store materials up above the bottom two or three shelves in your stacks where space permits. It is also a good idea to have drains in the floors where practical so as to discourage standing water.
Keep Materials off the floor
Placing materials directly on the floor can put them at high risk of danger should you have flooding in this storage facility. Flooding and water damage can be caused by Mother Nature but can also be caused by broken pipes or spills, so even if you do not live on a flood plain, you should still be concerned about water damage. It is a good idea to keep your materials not just up off the floor but on the higher shelves in your storage area, if possible. In cases in which objects must be on or near the ground, consider use of buffering materials and/or risers to prevent direct damage. Bear in mind that many storage containers are often hygroscopic and water touching the bottom will wick up.

In addition to basic preventative measure to minimize water damage, many cultural institutions also utilize water detectors to identify water leaks and provide an immediate alert. These sensors can be placed in basements or in other areas that may be prone to environmental or accidental flooding. It is advisable to regularly check the battery on these alarms.
Security
Vandalism and theft are real threats for any cultural institution. Protecting museum, libraries, and archives, however, is a complex issue as every institution varies in size, each with their own unique set of issues and needs. It is thus necessary for every institution to implement and maintain a comprehensive security program to ensure the safety of employees, visitors, and the artifacts.
The key to an effective security program is to have solid controls in place to aid in the protection, detection, and response according to the vulnerability of the assets and the access required. First and foremost, an integrated program should establish organizational measures and policies to include access/key control, guards, visitor regulations, entrance checks, and emergency preparedness and response. Keys should be issued strictly on an as-needed basis. There is no reason for every staff or board member to have to the key(s) to storage areas or display cases, for instance. In addition, all security systems should should take into consideration the construction of the building. All areas of vulnerability—windows, skylights, fire escapes, loading bays, doors, drain pipes—must be assessed and protected. Drainpipes, for examples can be fitted with spikes, while window frames should be strongly constructed with locks that conform to national standards.
In addition to safeguarding the building, low-tech and high-tech systems should also be installed to assist security and protect the collections. The most important measure is to keep interior areas locked. Low-tech security measures include providing levels of access to the facility and collections, using staff and visitor badges, bag searches, maintaining a sign-in and sign-out sheet for all staff and visitors, and monitoring researchers as they use the collections. Other low-tech security measures include the use of barriers near entrances, such as turnstiles or revolving doors, stationing staff in exhibit areas to monitor activity, and securing display cases and works of art with locks, brackets, or hanging devices.
The use of high-tech security measures is also important in achieving an integrated security program. Ideally, an institution should utilize multiple devices to minimize risk while maximizing protection of the collections. These devices include intruder alarms, motion detectors, electronic locking systems, panic buttons, and CCTV cameras, which may deter potential theft or vandalism. It is important to note that these high-tech systems should be regularly maintained to prevent false alarms.
Items on display are particularly vulnerable to theft. Small objects, like coins and arrowheads, which are easy to conceal in clothing, are particularly vulnerable to theft. It is necessary to modify displays and exhibits to minimize risk. Any valuable or rare items, particularly those that are easily picked up and transported, should be secured in locked cases/enclosures.
Supervision and Theft Risk
Keeping collections secure often means mediating public access to materials. The more control and supervision you have over your collection materials, the more you can protect them from damage. Circulating collections take the most abuse and are consequently the most potentially at-risk for damage. The following are levels of access control:
- High control
- These are collections that are kept locked away from public access. These materials are rarely, if ever, used and only by trained staff. The public cannot handle these materials. These materials are, as a result, at very low risk of theft.
- Moderate control
- These are collections to which the public has mediated access. Qualified researchers can access these materials in a monitored environment, such as a reading room or designated viewing/listening space. Researchers can handle items with proper restrictions and under supervision. These materials are at moderate risk for theft, as well as improper handling and use.
- No control
- These are collections that are stored in public areas. Researchers can access these materials in unmonitored environments. These materials are at high risk for theft, as well as improper handling and use. These are typically part of an educational collection, not a permanent or special collection.
Resources
- Artim, N. (1993). Cultural heritage fire suppression systems: Alternatives to Halon 1301. WAAC Newsletter, 15(2), 34-36. Retrieved from: http://cool.conservation-us.org/waac/wn/wn15/wn15-2/wn15-209.html"
- National Film Preservation Foundation (NFPF). (2004). The Film Preservation Guide: The Basics for Archives, Libraries, and Museums. San Francisco, CA: National Film Preservation Foundation. Retrieved from: http://www.filmpreservation.org/preservation-basics/the-film-preservation-guide
Additional Information and Tools
When to Bring in a Professional
The PSAP is meant to provide a starting point to help focus your resources and attention on materials at the greatest risk of loss. While the PSAP strives to give you accurate and responsible advice regarding the preservation needs of your collection materials, it cannot replace the value of having a preservation professional advise you. The PSAP is meant to provide a starting point to help focus your resources and attention on those materials at the greatest risk of loss. This information, combined with an articulated value of the material to your collection, will lead you to have preservation priorities in need of action. While some actions can be done with little to no training, such as rehousing acidic papers in a buffered enclosure and lower and stable temperature and relative humidity, other steps require professional help. The repair of materials, for instance, should only be taken on by a professional conservator trained in an appropriate area of expertise. Likewise, if you have questions about where to go next to build a more fulsome preservation plan or program, a preservation or conservation professional would be able to offer professional advice to lead you in the right direction, or even complete a plan for your institution.
The American Institute for the Conservation of Historic and Artistic Works has a wonderful resource to help people find and understand professional conservation services here. Other professional services may be identified by contacting your local library, archive, or museum to find out where the closest appropriate preservation professional may be employed.
Disaster Resources and Recovery Vendors
The websites provided here were last accessed in 2016. If some links are inaccessible in the future, it may be possible to retrieve the information by using a search engine to find these organizations or titles.
Disaster Resources
* This disaster resources list was compiled by Patricia Miller, the Executive Director of the Illinois Heritage Association.
- American Institute for Conservation of Historic and Artistic Works (AIC)
- AIC's website features a number of disaster recovery resources, including the sections "Disaster Response and Recovery" and "Emergency...If You're First..." Members of AIC's Collections Emergency Response Team (AIC-CERT) are available to provide 24/7 disaster assistance to museums, historical societies, libraries, archives, and the general public. Under some circumstances, on-site assistance can be arranged. In addition, AIC can provide the names of experts in the conservation of paintings, paper, books, photographs, textiles, decorative arts, sculpture, and wooden artifacts as well as architectural, archaeological, natural science, and ethnographic materials. The AIC-CERT emergency number is (202) 661-8068.
- Amigos
- This website includes a disaster planning template for libraries and archives as well as a listing of related suppliers and resources. Like AIC-CERT, Amigos also provides advice by telephone. You can contact the Amigos Support Desk at amigos@amigos.org or by calling between 8am and 6pm CST at 1-800-843-8482 (972-851-8000 in the Dallas area), ext. 2863.
- American Association of Museums
- This website has selected information on disaster preparedness and response, including disaster plan development and recovering business operations.
- California Preservation Program
- CPP's website provides information, education, and expert advice on preservation of collections to libraries, archives, historical societies, cultural institutions, and record repositories in California. The site includes an excellent template for a disaster plan as well as information on disaster preparedness and recovery that is widely applicable to places outside of California.
- Canadian Council of Archives
- This website contains instructions for packing and salvaging library materials, and it offers free downloads of pamphlets, including "Disaster Planning and Recovery," "Where to Go for Help," and "Salvage Operations for Water Damaged Archival Collections: A Second Glance by Betty Walsh."
- Center for Great Lakes Culture
- A joint project of the Library of Congress, the Center for Great Lakes Culture, and the California Preservation Program. It can be searched by state, by multiple states, or by type of service, expert, or supply.
- CLRC Disaster Recovery Resource Guide
- Prepared by the Central Library Resources Council, this resource guide helps libraries and archives in the Central New York Region locate supplies for disaster preparation and recovery.
- CoOL Disaster Preparedness and Response
- CoOL (Conservation Online) offers an extensive list of and links to disaster preparation information and resources, including disaster plans, case histories, and resource organizations.
- Conserv O Grams
-
The National Park Service's Museum Management Program has a listing of Conserv O Grams on numerous topics. Below are some that relate to emergency preparedness and disaster planning.
- 1/9 Use of Ultraviolet Induced Visible-Fluorescence in the Examination of Museum Objects, Part I, 2000
- 1/10 Use of Ultraviolet Induced Visible-Fluorescence in the Examination of Museum Objects, Part II, 2000
- 2/6 Preparing Salvage Caches for Emergency Use, 1993
- 3/4 Mold: Prevention of Growth in Museum Collections, 2007
- 7/7 Emergency Treatment for Water-Soaked Furniture and Wooden Objects, 1993
- 21/1 Health and Safety Hazards Arising from Floods, 2002
- 21/2 An Emergency Cart for Salvaging Water-Damaged Objects, 2002
- 21/3 Salvage of Water-Damaged Collections: Salvage at a Glance, 2002
- 21/4 Salvage at a Glance, Part I: Paper Based Collections, 2002
- 21/5 Salvage at a Glance, Part II: Non-Paper Based Archival Collections, 2002
- 21/6 Salvage at a Glance, Part III: Object Collections, 2002
- 21/9 Be Prepared: Develop a Museum Emergency Operations Plan
- 21/10 Museum Staff Emergency Procedures: A Sample Emergency Telephone List
- 21/11 Museum Staff Emergency Procedures: A Sample Emergency "Flip Chart"
- Council of State Archivists
- CoSA is a national organization of individuals who serve as the principal archivist agencies in each state and territory government. This site includes templates for a Pocket Response Plan, a basic format for a disaster response document with guidance on how to customize it, and a Toolkit that includes a resource directory for disaster preparedness.
- Disaster Center Index Page
- The Disaster Center Index features up-to-the-minute information from the Federal Emergency Management Agency (FEMA) on flooding and on the risk of severe weather, fire, and other disasters.
- Disaster Recovery Journal
- Free online journal.
- Federal Emergency Management Agency
- FEMA's general website offers links to disaster information.
- FEMA: Environmental Planning & Historic Preservation Program (EHP)
- This program integrates the protection and enhancement of environmental, historic, and cultural resources into FEMA's mission, programs, and activities; ensures that FEMA's activities and programs related to disaster response and recovery, hazard mitigation, and emergency preparedness comply with federal environmental and historic preservation laws and executive orders; and, provides environmental and historic preservation technical assistance to FEMA staff as well as local, state and federal partners, grantees, and subgrantees.
- FEMA: Information Resource Library
- The FEMA library is a database of publicly available FEMA resources. Many of these resources are available for download directly from this website, although some are not available online and must be ordered as hard copies (e.g. DVDs, CDs, VHS tapes, audio tapes, brochures, and other documents).
- FEMA: National Response Framework
- The National Response Plan was replaced by the National Response Framework, effective March 22, 2008. The National Response Framework (NRF) presents the guiding principles that enable all response partners to prepare for and provide a unified national response to disasters and emergencies. It establishes a comprehensive, national, all-hazards approach to domestic incident response.
- Harvard Emergencies, Disaster Recovery
- Preservation Services links to useful information about emergency planning and the salvage of library materials.
- Heritage Emergency National Task Force
- Heritage Preservation page containing resources for disaster planning and response, including links to many helpful articles that can be downloaded and information about materials that can be purchased. Also featured is a 2002 report from Heritage Preservation on behalf of the Heritage Emergency National Task Force, Cataclysm and Challenge: The Impact of September 11, 2001, on Our Nation's Cultural Heritage ".
- Heritage Preservation
-
Heritage Preservation works to save the objects that embody our history, partnering with conservators, museums, civic groups, and concerned individuals across the nation who care about preserving our past. A Public Trust at Risk: The Heritage Health Index, a report issued in 2006, concluded that immediate action is needed to prevent the loss of 190 million artifacts that are in need of conservation treatment. Available for purchase from Heritage Preservation are two disaster planning tools: the Emergency Response and Salvage Wheel and Field Guide for Emergency Response.
Heritage Preservation's Emergency Response and Salvage Wheel is now available as a free mobile app. The salvage wheel may also be purchased directly from Heritage Preservation.
- Library of Congress
- The Library of Congress offers information on preparing, protecting, and preserving family treasures. It also provides short video clips on preservation techniques along with tips on dealing with disasters and links to other sites.
- Lyrasis
- This nonprofit organization has been created from the merger of Palinet and Solinet, two of the strongest and most successful library networks. This site has many useful resources for planning and recovery of library materials. Begin with Disaster Resources. You can also access the widely-acclaimed Solinet article, "The Invasion of the Giant Spore" through Lyrasis.
- Minnesota Historical Society Emergency Preparedness Plan
- Comprehensive (96 pages) plan [pdf]. A good model.
- National Archives and Records Administration (NARA)
- Records Emergency Information and Disaster Response info. Links to cultural and historical organizations and to the general public. Extensive information on salvage of library materials. Some overlap with other resources.
- National Voluntary Organizations Active in Disaster
- National VOAD is the forum where voluntary organizations share knowledge and resources throughout the disaster cycle—preparation, response, and recovery—to help disaster survivors and their communities. VOAD holds a national conference in mid-May each year.
- Northeast Document Conservation Center (NEDCC)
-
Go to NEDCC's website to find Preservation Leaflets: Planning and Prioritizing; The Environment; Emergency Management; Storage and Handling; Photographs; Reformatting; and Conservation Procedures. The pamphlets on emergency management are especially useful. NEDCC also offers a phone number for emergency assistance, and dPlan, a free online planning tool for organizations with paper-based collections.
COSTEP, an initiative of NEDCC, provides coordinated statewide emergency preparation for New England states and is a model for other statewide planning.
- Protocol for Emergencies
- This article by Shelley Reisman Paine provides a good sample of steps to follow in an emergency in an art gallery.
- Recovery from Disaster Handbook
- Homeland Security and Emergency Management (HSEM), a division of the Minnesota Department of Public Safety. Written from a community perspective. Numerous Word documents and pdf documents can be accessed from this site.
- Salvage Procedures for Wet Collections
- Specific information on how to salvage many types of materials, excerpted from the Minnesota Historical Society's Emergency Preparedness Plan.
Disaster Recovery Vendors
The Preservation Self-Assessment Program assumes no responsibility for the professionalism of any of the vendors and consultants either listed by or related to these resources. Additionally, these lists are not meant to endorse, recommend, or require use of any private vendor/consultant, nor does omission indicate censure.
-
Florida Department of State, Division of Library and Information Services.
http://dlis.dos.state.fl.us/DisasterRecovery/vendors.cfm -
National Archives and Records Administration (NARA). This list encompasses the salvage of records and disaster recovery vendors.
http://www.archives.gov/preservation/disaster-response/vendors.html - Northeast Document Conservation Center (NEDCC). While NEDCC maintains a great list of disaster recovery vendors, it frequently changes URLs. Search NEDCC’s website at www.nedcc.org for more information.
-
New York State Archives. A list of disaster recovery vendors to aid government agencies, local governments, and other similar entities.
http://www.archives.nysed.gov/records/mr-disaster-vendors
Grant Resources
Funding opportunities are constantly in flux, but there are some institutions that typically offer assistance for preservation projects. Often, eligibility is dependent on the content that you are seeking assistance to preserve.
The Library of Congress published this extremely useful document detailing foundation grants for preservation in libraries, archives and museums.
Many collecting institutions apply for support from the National Endowment for the Humanities' (NEH) Division of Preservation and Access.
Funding opportunities from the NEH for preservation include:
- Common Heritage supports digitization of cultural heritage materials and the organization of public programming at community events.
- Documenting Endangered Languages supports fieldwork and other activities relevant to recording, documenting, and archiving endangered languages.
- Humanities Collections and Reference Resources supports projects that provide an essential underpinning for scholarship, education, and public programming in the humanities.
- Preservation Assistance Grants for Smaller Institutions supports small and mid-sized institutions with non-digital collections.
- Research and Development supports projects that address major challenges in preserving or providing access to humanities collections and resources.
- Sustaining Cultural Heritage Collections supports the planning and implementation of preservation strategies that pragmatically balance effectiveness, cost, and environmental impact.
The Role of the Artifact in the Age of Digitization
If you have logged onto the PSAP, you likely already understand the value of the artifact, but arguing for the cost of continued care of physical collections in the face of immense digitization initiatives in cultural heritage institutions can be difficult. In the end, while digital collections can reach billions of potential scholars and school children, it is the interaction with an original artifact, be it a Thomas Brady photograph of Abraham Lincoln, a book published in the 1700s, a letter written in Edgar Allen Poe’s own hand, or a map that went into space on a NASA mission, that provides the most meaningful interaction between person and object. We, the preservation and cultural heritage professionals behind the PSAP hope that our project will help users make the argument for the continued preservation of the original artifact.
Some great academic writing exists on this subject and may be of interest for those seeking to pursue this topic further:
Stephen Nichols and Abby Smith in the Council on Library & Information Resources report The Evidence in Hand: Report of the Task Force on the Artifact in Library Collections, 2001.
Pearson, David. Books as History: The Importance of Books Beyond their Texts. New Castle, Delaware and London, England: Oak Knoll Press and The British Library, 2012.
Carignan, Yvonne (ed). Who wants yesterday's papers? Essays on the research value of printed materials in the digital age. Scarecrow Press, Lanham, MD, 2005.
Mapping to Past Perfect
PastPerfect websitePastPerfect structures data about your resources differently than we do. This means that importing resources will not be as simple as downloading from PSAP and uploading into PastPerfect. You will need to make some changes to the information that you download from PSAP so that PastPerfect can understand it. Making PSAP data intelligible to PastPerfect (also known as data mapping) requires a little bit of patience and a working knowledge of Excel. If you do not have patience or basic Excel skills, we recommend that you contact PastPerfect - they do offer import assistance for a fee.
Step 1: Exporting From PSAP
Prepare for exporting a data file from PSAP by checking that all of your resources, locations, and institutions have been assessed. If this step is neglected, your data file will have missing and/or inaccurate data.

How you choose to export from PSAP depends upon your desired result. You can export single items or collections by entering the detailed record and clicking the Export button. If you want to export all of your resources, go to My Institution Resource Search Export CSV.
A CSV file will begin to download to the default downloads folder on your computer (often, this folder is called Downloads). Navigate to the file on your computer, right click (or CTRL + click if using a Mac), and select Open with... Microsoft Excel. If you are unable to open the file in Excel, double check that the file extension is .csv - if it is .txt or another extension, rename the file and replace the extension with .csv.
Step 2: Creating Custom Fields
Depending on the formats included in your data file, your will have different headings. Every question and response during your assessment, for example, are converted into a heading and an associated value.
PastPerfect does not have corresponding fields for this kind of information. Fortunately, each PastPerfect catalog allows for twenty-two custom fields that you can create. If capturing assessment questions and values is important to your institution, we recommend that you create custom fields in PastPerfect for that data. We recommend that at the minimum, you add a field for the PSAP Assessment Score.
To create custom fields in PastPerfect go to Main Menu Setup Custom Fields.
Step 3: Cleaning Up Your Data
Now that you have your PSAP data in a file format that PastPerfect can read, you will need to clean it up so that PastPerfect can decipher what it is reading. Follow the instructions on the PastPerfect import instructions to ensure that your data file complies with PastPerfect requirements.
To help you import your resources, we have mapped PSAP fields to PastPerfect fields in several PastPerfect catalogs including: Photos, Archives, and Library. We recommend that you do not attempt to use the PastPerfect Media catalog for PSAP resources. It is designed to support media that has been digitized, where users have access to metadata on the original object. The Media catalog fields to not readily map to fields that PSAP establishes. If you have A/V resources that you would like to import into PastPerfect, we would recommend that you use the Archives catalog and icorporate custom fields as needed to faithfully describe your resources.
Step 4: Mapping your Data
To improve the likelihood of a glitch-free import process, change the column headers in your Excel spreadsheet of PSAP data so that they match the PastPerfect attribute name, listed below (or download an Excel spreadsheet here). Note that these differ depending on the PastPerfect catalog you are using.
Photos Catalog
The Photos catalog in PastPerfect is designed to manage metadata related to positive and negative photographs on a variety of supports. It corresponds to formats found in PSAP's Photo & Image Material, and may also represent some formats in Audiovisual Media.
Photos Catalog PSAP to PastPerfect Medadata Mapping
See the full field descriptions here.
Elements marked with a are required fields.
| PSAP | PastPerfect |
|---|---|
| Created | Catalog Date |
| Parent Resource | Collection |
| Assess the degree of image fading, discoloration, and/or staining | Condition |
| Rights | Copyright |
| Date | Date |
| Description | Description |
| Extent | Dimension Details |
| Location | Home Location |
| Note | Notes |
| Local Identifier | Object ID |
| Title/Name | Object Name |
| Creator | Photographer |
| Format | Processing Method |
| Subject | Subjects |
| Updated | Updated |
Archives Catalog
The Archives Catalog is probably the representation that is closest to the PSAP. The catalog is designed to support information related to documents, manuscripts, oral histories, videotapes, personal papers, maps, and music collections. This catalog is most likely to correspond to PSAP formats in the Paper & Book heading as well as some resources in Audiovisual Media.
Archives Catalog PSAP to PastPerfect Medadata Mapping
See the full field descriptions here.
Elements marked with a are required fields.
| PSAP | PastPerfect |
|---|---|
| Parent Resource | Collection |
| Is the paper discolored and/or brittle? | Condition |
| Rights | Copyrights |
| Creator | Creator |
| Date | Date |
| Extent | Extent of Description |
| Location | Home Location |
| Language | Language of Material |
| Format | Medium |
| Note | Notes |
| Local Identifier | Object ID |
| Title/Name | Object Name |
| What is the state of the image, in terms of physical damage sustained? | Physical Characteristics |
| Subject | Subjects |
| Updated | Updated |
Library Catalog
The Library catalog in PastPerfect is designed to manage metadata for books, periodicals, newspapers, pamphlets, and recordings. These items loosely correspond to resources found in the Paper & Book heading as well as some resources in Audiovisual Media.
Library Catalog PSAP to PastPerfect Medadata Mapping
See the full field descriptions here.
Elements marked with a are required fields.
| PSAP | PastPerfect |
|---|---|
| Parent Resource | Collection |
| Is the paper discolored and/or brittle? | Condition |
| Rights | Copyrights |
| Creator | Creator |
| Date | Date |
| Extent | Extent of Description |
| Location | Home Location |
| Language | Language of Material |
| Format | Medium |
| Note | Notes |
| Local Identifier | Object ID |
| Title/Name | Object Name |
| What is the state of the image, in terms of physical damage sustained? | Physical Characteristics |
| Subject | Subjects |
| Updated | Updated |